User’s Guide
Introduction
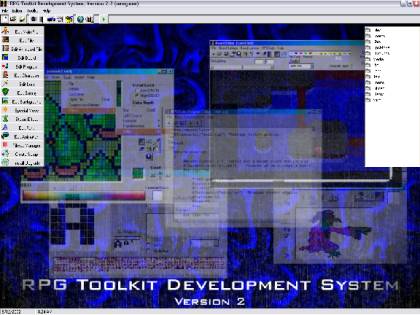
Welcome to the RPG Toolkit Development System, Version 2.2! This version, the Powerhouse Edition, features a wider array of multimedia support (including MP3), and contains features such as auto-upgrade, an RPGCode menu editor and a debugger.
The RPG Toolkit Development System is a Role Playing Game editor, which allows you to create your own RPG games with no prior experience or programming skills. It is extremely flexible and allows for an infinite variety of game play. Since it keeps a minimum of information in memory while it’s running, the size of a game is limited only by the available hard drive space on the computer you are using. A game created with the Toolkit can range from a very simple 10 screen demo to an immensely complex world in which dwells hundreds of characters, enemies and heroes, all of which can interact with the player.
This is the second edition of this user’s guide. It features extensive revisions of the text to keep up with the ever-changing nature of the RPG Toolkit.
I thank you very much for purchasing the registered version of the Toolkit. It is people like you who help me continue to develop this program further. Also, sales from the registered version of the Toolkit will go into developing new programs such as Immerse, so we can all benefit from further game development systems.
Much work has gone into the development of this new edition, and I sincerely hope you enjoy it. As always, I am open to suggestions for improvements and changes. You can email me at cbm@rpgtoolkit.com, or just visit the RPG Toolkit homepage (http://rpgtoolkit.com).
Christopher B. Matthews
Awesome Computing
June 11, 2002
The Fast Track To Making an RPG
This manual is designed to step you through the process of creating your own RPG. It will take you into every detail of designing a game, and once you’ve read it through, you should be able to create a really cool game.
If you’d like to get up and running very quickly, I suggest reading the enclosed tutorial.
If you want to just know the basics for now, you can create a very simple RPG. The minimum of things you must do to create an RPG with the Toolkit are:
1. Create at least one board and set the initial player position (see the Board Editor section)
2. Create at least one character with a full graphic set for walking (see the Character Editor section). You can use one of the included characters for now if you don’t want to make a new one.
3. Create a Main File with the following information: The Menu activation key, the initial board file, and the initial character file. See the Main File section for info on this.
4. Run the game with the trans2.exe program. See the section on trans2.exe for info on this.
If you do these four things, you’ll have a basic game where the character can walk around. These basic files are created for you when you create a new game. You might want to do this first just to get a basic feel for the Toolkit, and then follow the manual step by step to see exactly how to make an in-depth RPG. Have fun!
Installing and Starting the Program
The installation program should run automatically when you insert the Powerhouse Edition CD. If it does not, open Windows Explorer, and run setup.exe off the CD.
The installer will ask you where you’d like to install the Toolkit, and then it will ask you for your CD key. Type the CD key that is printed on the back of the CD jacket that came with the Powerhouse Edition.
Once the program is installed, select the Toolkit Editor from the Start menu group that was created, and you’ll be on your way!
Main Menu
 Once the splash screen goes
away, you will see the Main Menu screen, which has buttons that will take you
to different places in the program.
Once the splash screen goes
away, you will see the Main Menu screen, which has buttons that will take you
to different places in the program.
I’m not going to cover them in the order stated above. Rather, I’ll cover each topic in the order that they should be covered. If you’ve never made an RPG game before with the Toolkit, then following the order of things throughout this manual will get you quickly on the road to doing so. This manual is more of a tutorial than a reference guide.
So, shall we begin our journey?
Creating A New Game
The very first thing we will do is create a new game. You can do this by clicking on the ‘New’ button in the top-left hand corner of the Main Screen. This will pop up a new window. Just type in the name of the game you’d like to create and hit ‘Setup My Game!’
See the tutorial for info on what exactly takes place when you create a new game.
Edit Tile
 The first thing to do is create
some tile graphics. Enter the Tile
Editor by clicking on “Edit Tile” from the Main Menu. A new window will open up.
The first thing to do is create
some tile graphics. Enter the Tile
Editor by clicking on “Edit Tile” from the Main Menu. A new window will open up.
Right now you are ready to begin making a tile. But before doing that, I should probably explain what a tile is.
Tiles in the RPG Toolkit
Games that you make with the RPG Toolkit are referred to as tile based games. What this means is that nearly every graphic you see in that game- from a town scene to your character’s graphic- is made up of one or more tiles.
A tile is just a little square graphic that you put together with other tiles to create a larger scene. Since every graphic is made up of tiles in your game, tiles are the core of every game you make. How your game looks depends entirely on the style of tiles that you create.
In the RPG Toolkit, a tile can be a graphic made up of 32x32 pixels or 16x16 pixels. Enough definitions. Let’s make some tiles.
Colors and Pixels
The Toolkit supports 16 million colors- that is more than enough to reproduce photographic quality graphics.
When you enter the Tile Editor window, you will see a large white box on the left. This is called the Tile Form, and it is here that you create your own tiles. To the bottom right of the window is a smaller box. This is the Image Box, and shows you what your tile looks like to proper scale.
Notice that a grid divides the Tile Form up into 32 x 32 squares. This is a larger representation of the tile itself, which is 32 x 32 pixels in size.
Click on the large colored bar on the bottom of the window. This Color Bar provides you with quick access to lots of colors. When you click on a color in the Color Bar, you are selecting the color you want to use in the tile creation.
Once you have selected a color from the Color Bar, click anywhere on the Tile Form. Notice that the color you selected gets put on the Tile Form (and also on the scaled down Image Box). This is basically how you make tiles- just draw things on the Tile Form using different colors.
For now, just draw a simple figure or a scribble or something, so you can get the feel of the Tile Editor.
Tools That Make Your Job Easier
The Tile Editor is very similar to most painting programs. Along the right side of the window are a number of buttons that do different things. The buttons are as follows:
|
|
Pencil Tool – Used to draw the tile. |
|
|
Eyedropper Tool – Used to capture colors off the tile. |
|
|
Fill Tool – Used to flood fill parts of the tile. |
|
|
Eraser – Used to erase pixels from the tile. |
|
|
Line Tool – Used to draw lines. |
|
|
Circle Tool – Used to draw circles. |
|
|
Filled Circle Tool – Used to draw filled circles. |
|
|
Rectangle Tool – Used to draw rectangles. |
|
|
Filled Rectangle Tool – Used to draw filled rectangles. |
Not very complicated stuff. You can easily survive in the Tile Editor using everything you’ve learned so far (obviously, you load and save tiles through the File menu up top). However, if you’re interested in being a power user and using the Tile Editor to it’s fullest potential, the next section is for you! Remember- tiles are the backbone of your game. If you make awesome tiles, you will have awesome graphics.
Advanced Features
Like I said, the Tile Editor is really simple, but you probably want to use some of the better features that will make your tiles really good. A good place to start is color...
Ways of Selecting Color
Apart from clicking on the Color Bar to select colors, you may wish to select a very specific color that you just can’t pinpoint on the Color Bar itself. There are two other ways of selecting color in the Tile Editor. You can find them under the Color menu at the top of the screen.
The first way of selecting a color is by using the Windows color selection dialog. Select this from the Color menu by choosing ‘Select Color’. This opens the color dialog.
If you choose to create a custom color, you can blend different intensities of Red, Green and Blue. By sliding the Red, Green and Blue sliders around, you can adjust the levels of each color component. All colors can be created by mixing red, green and blue (white is a mixture of all three at maximum intensity, black is the lowest intensity of all three, purple is an equal level of red and blue, etc).
The next way of selecting a color is DOS Palette. Select this from the Color menu. This opens up a window that gives you a palette of 256 colors. This is the standard DOS palette used by version 1.4. You can select a color by clicking on it, or by entering the color value in the box to the left (just like version 1).
Color and Detail
By default, all tiles you create are 32 x 32 pixels in size and use 16 million colors. If you are a version 1.4 user, you will know that version 1 uses 16 x 16 sized tiles with only 16 colors. Well, if for some reason you think that looks cool, you can change the color depth and detail of your tile by playing with the detail and color depth switches on the top right of the window. When you reduce the detail or color, it is a permanent change, so don’t just do it haphazardly.
Often you can reduce the color of an image to 256 colors without much change. You may want to do this because a tile that uses only 256 colors takes up less disk space than one that uses 16 million colors. I don’t really push it though, because you can get the best image quality from a tile with 16 million colors, and if the file size is a little bigger, who cares, right? You might want to reduce the color depth to 16 colors if you are especially crazy about disk space, but the tiles won’t be pretty!
Reducing detail, though, can actually come in handy. I find that it’s good to start a tile off in 16 x 16 mode, draw the basic image and then increase the detail to 32 x 32. Once the detail is increased, I round out the edges and touch it up. This saves a lot of time when you’re making a bunch of tiles.
If you are going to be opening tiles from a game made with version 1.4, you can increase the detail and color depth of the tile and spruce it up a lot. You don’t have to change tiles made by version 1.4, though. Version 2 can handle them just fine when it comes down to using them.
Nifty Tools
Under the Tools menu are a bunch of really useful tools. You can Flip and Rotate your tile directly from the Tile Editor, which is really useful when making characters and other things that are symmetrical. (In case you haven’t figured it out, you flip and rotate the image using the Flip and Rotate commands from the Tools menu).
This can come in really handy when you are making a series of tiles that make up a larger image. For example, let’s say you were making a bunch of carpet tiles. Well, you could draw the northwest corner of the carpet and then save it. Then you’d just have to flip it to get the northeastern corner, and then you could rotate it to get the other two corners. This saves a lot of time, and you will quickly become addicted to it after using it.
There are more tools under the Effects submenu (Tools / Effects). These tools include effects like Blur, Skew and Texturize.
The Skew option allows you to skew the tile by slanting it on a 45-degree angle. It skews horizontally from left to right. If you want to skew in another direction, you can flip and rotate the tile first, and then skew it. Skewing is useful when creating 3d corners. For example, let’s say you have created a brick tile. You can skew that tile so that it’s skewed vertically from top to bottom and bottom to top to create two corners. This looks really good when these tiles are used in games (i.e. the towers of the castle in the demo game uses this).
The Import... option allows you to convert a graphic to a tile. When you select Import from the menu, a new screen opens up and asks you to select a filename. Simply choose a file and hit the ‘Import’ button to import the graphic. This method is good for importing pre-sized graphics (32x32). If you need to import an image that hasn’t been properly sized, you’ll have to use the Grab option. After you import a tile, hit the ‘Redraw’ button in the Tile Editor to show the new tile.
The Grab Tiles option is very similar to the import option. It allows you to import graphics ripped straight from a picture of any size. When you select Grab Tiles, a new window opens up with a button that allows you to select a graphic first. Just use this to load the file of your choice, and it will be displayed in the window. Now, you have to specify what part of the image you want to grab. You do this by clicking on the image itself. Click once to define the top left hand corner of the tile, and click again to define the bottom right hand corner of the tile. A blue box will be drawn showing you the selected area. Next, hit the ‘Grab Tile’ button. The image will be captured, and you will be taken back to the Tile Editor. Hit ‘Redraw’ in the Tile Editor to se the new tile.
Probably one of the most useful tools, Layer Tile allows you to blend two tiles together into one. Let’s say you were making a Tree tile. Now, obviously, the tree will have grass behind it. But you have a separate grass tile made, and you don’t want to have to draw it over again when you draw your tree. Well, Layer Tile takes care of this. Here’s how:
First, draw your tree tile. Make sure you leave the white area white. The white areas in the Tile Editor represent the ‘transparent’ area of the tile (unless you actually put the white color over it). Once your tree has been drawn, save it. Next open up your grass tile. Now, if you select Layer Tiles from the menu, you will be taken to a new window.
In this window, you can select the filename of the tile you want to Layer on top of the currently opened tile. So, select your tree tile. And now hit ‘Layer’. The tree tile will be placed over top of the grass. If you hit ‘Redraw’ in the Tile Editor, you will see this.
Another option in the Layer Tiles window is ‘Transparency Layer’. If this is selected, then the two tiles will be blended together by mixing their colors. Try it!
The Texturize option simply applies texture to your tile. For example, when you draw a grass tile, you’ll probably just fill the screen with a color of green. Well, really grass is not flat green. By texturizing it, many shades of green will be placed on the image. Using Texturize in conjunction with Blur can help you create very realistic looking tiles. Most tiles in the demo game were created this way.
The Blur option just makes the tile slightly blurry. One word of caution, though: It will destroy all transparency information, so if you want the tile to have transparent portions, don’t blur it!
The Light Source option allows you to apply shadows to the tile. When you select this option, a new window opens up with your tile on it. This window allows you to specify where obstructions on the tile are located. An obstruction is anything that doesn’t allow light to pass through it, so when the light is applied, the obstructions will cast shadows.
You can define the areas of obstruction simply by clicking on the tile itself. The areas of obstruction will be highlighted.
Next, you can specify the source of the light and direction. Clicking on the ‘Light Source’ circle to the left does this. The longer you make the line, the longer the shadows will be. When you’re ready to cast the light over the tile, hit ‘Apply Light’. Then hit ‘Redraw’ in the Tile Editor to see the new tile.
The last option in the Tools menu is Compression Options. This takes you to a new window that lets you turn file compression on or off. Compression can significantly decrease the file size of your tiles. This only works well if there are few colors in your tile, though. If there are many colors (as the result of importing graphics, texturizing or blurring), you should turn compression off. In this case, turning the compression off will actually make the file smaller.
Tilesets
The RPG Toolkit has two different ways of saving tiles. When you save your tile, it is automatically saved as a TST (tileset) file. Tilesets are used to store more than one tile in a single file.
You can create new tiles, and if you save them with the save .tst filename, they will be automatically appended to the end of the existing tileset.
The other way of saving tiles is by using the GPH format. This is an older format used to save individual tiles. If you want to save a tile this way, you must explicitly add the .gph extension at the end of the filename when you save it. GPH tiles work everywhere, but there are a few drawbacks:
The .gph file format is large. One tile can be as big as 11kb.
You will end up with hundreds of tiles in your \Tiles\ directory.
You will have to remember all of the filenames for these tiles.
To fix these problems, a new file format was introduced in Revision 4, called the Tileset (.tst) format. The new Tileset format has the following advantages:
The format is very small. It can be nearly 4x smaller than the .gph format.
You can put many tiles into one .tst file, so your \Tiles\ folder won’t get crowded.
The .tst format is visual. When you open a tileset, a window is opened showing all the tiles in the file. To choose one, you just have to click on it. You don’t have to remember hundreds of filenames.
As long as you use the default TST format, you will have all of these advantages.
When you want to load a tileset, just select the TST file. This will pop up a window showing you all the tiles in the set, and you will be able to click on the one you want to open. It’s really easy, and it’s a lot faster than using .gph tiles.
Do yourself a favor. Use tilesets!!! Things will be much easier and faster for you. Also, any tiles that I release on my website are now stored in the .tst format. I am hoping to retire the old .gph format as it is no longer needed. You should try to do the same. On a final note, if you want to save all of your tiles into the .tst format, use the ‘Tileset’ option in the main menu. You can flip ahead to the tileset section of this manual, too.
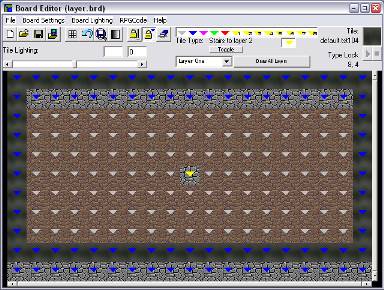
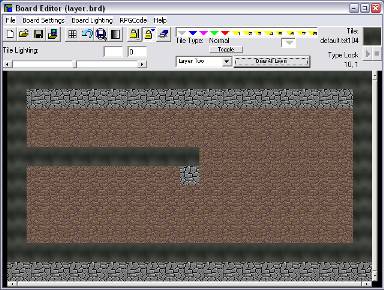
Edit Board
 The next most important option
is the Board Editor. It is here that
you actually get to use your tiles and create scenes for your game. So, the first thing you want to do is select
“Edit Board” from the Main Menu screen.
This will open up the Board Editor window.
The next most important option
is the Board Editor. It is here that
you actually get to use your tiles and create scenes for your game. So, the first thing you want to do is select
“Edit Board” from the Main Menu screen.
This will open up the Board Editor window.
What is a board? Well, basically, it’s just one screen in your game. Each board is a different ‘room’ in a dungeon, or it can be part of a much larger map. Basically, boards are what your player walks on and moves through throughout the game- all your boards together make up the game ‘world’.
So, let’s make our first board. You will notice that the board editor has a large white area. This is the Board Form- and this is where you will see your board that is in progress. Above the Board Form are a number of buttons that let you do many things. Well, here’s what they do...
Laying Tiles
Before doing anything, you may want to do this: click on the Grid button to turn the board grid on (5th from the left).
The first thing you’ll want to do is select a tile to draw with. Do this by clicking on the ‘Select Tile’ button at the top of the screen, 4th to the left. (the more lazy of you can just hit the ‘s’ key on the keyboard). This will open up a file selection window that lets you select the filename of the tile you want.
You can open up one of the tiles you just created, or open up one of the pre-made tiles that came with the Toolkit. In either case, once you open the tile of your choice, you should notice that the tile you just selected will be displayed in a little box at the top right of the screen. This box shows you your currently selected tile.
Now that you have a tile selected, just click on the Board Form, and the tile will be laid down on the board. That’s all there is to it! Just continue to lay down tiles to create a scene. You can select other tiles as well and use those, too. If you play your cards right, you can make very detailed screens only using a few different tiles!
Here’s a good tip: if you are using tilesets instead of individual tiles (I recommend that you do), you can hit the ‘L’ key to open up the last tileset you had opened. This speeds things up considerably.
Tile Types
OK, you’ve made a nice looking little scene, but now what? Well, first of all, you may think you’re done, but you’re not. There are a few more things you have to do to make a complete board. First of all is to set the Tile Types of each tile on the board.
Notice the row of colored triangles at the top of the screen. There’s also a little “Toggle” button. Above the “Toggle” button is some text that should say “Tile Type: Normal”. That means that all of the tiles that you just laid down were of type “Normal”. That means that the player can walk over top of any of those tiles just as if they were the floor. But hit “Toggle” once. You’ll notice that now it says: “Current Tile Type: Solid”. That means that any tiles you lay down now will be of type “Solid” which means that the player cannot walk over those tiles- they act as walls, or barriers.
You can redraw the scene if you want making sure that any ground you draw is of type “Normal” and any walls are of type “Solid”, but there is a quicker way to set all the tile types of the board.
Hit the “Type Lock” button at the top of the screen (10th from the left). This will put you in “Type Lock” mode (before you were in “Draw” mode). This mode allows you to change the Types of your tiles without changing their graphics.
When you enter “Type Lock” mode, you will see that each tile will get a little colored arrow put over it. Each arrow tells you what type that tile is. All of the arrows should be gray at this point because gray means that they are type “Normal”.
Hit the “Toggle” button until the tile type is set to “Solid”. Now click on the board form. Notice that when you’re in “Type Lock” mode, clicking on the tiles just changes the color of their arrows- it doesn’t change the graphics themselves. So now you can click on all the walls and change the arrows blue. Blue arrows mean ‘Solid’.
You can go back to “Draw” mode by clicking on “Draw Lock” any time.
There are many different tile types. They are listed below:
Normal- The player can walk over this tile. This is for making the floor.
Solid- The player cannot walk over this tile. This is for making walls.
Under- The player walks underneath this tile. This is good for making arches, or anything else that the player can walk underneath.
North-South Normal- The player can walk over this tile if he steps on it from the north or south, but if he comes to it from the east or west, it acts as if it were solid.
East-West Normal- The player can walk over this tile if he steps on it from the east or west, but if he comes to it from the north or south, it will act as if it were solid.
Stairs to Layer ‘n’- This type transports the player to board layer ‘n’. This will be described more later on...
Board Settings
Probably the most important menu in the Board Editor is the “Board Settings” menu. It’s here that you can set all of the board’s important information. Inside this menu are three options:
Board Information
Board Background
Set Player Position
These options are explained below...
Board Information
This option lets you specify all of the pertinent information for the board that you are currently editing. Once you select this, a new window will open up showing you the current board information. You can edit all of it here.
The first thing to look at is the “Directional Links”, or Board Links. These allow you to specify where the player will go if he or she walks off of the edge of the current board. So, if a player walks north and comes to the top of the board, where will s/he go once they step one space further north? Well, another board will be loaded and the player will start on the southern edge of that board.
You can specify the north/south/east/west links by clicking on the buttons assigned for this. This will open up a file selection window. You can enter the name of a board that currently exists, or even one that you haven’t created yet (if you don’t want there to be any link, just type “None”).
Here’s something you should note: just because board A is linked to board B, this doesn’t mean that board B is linked back to board A. So, if you make a northern link on a board, when you make that other board, it’s southern link should go back to the original board. If you don’t understand this upon reading it for the first time, don’t worry. It’s kind of common sense and you’ll probably discover this on your own, anyway.
Also, in order for a link to work, the corresponding tile on the next board must not be solid. If it is, then the player won’t be able to walk over it (i.e.- if the player walks from 1,1 and goes north, putting him at tile 1,11 on the next board, tile 1,11 must not be solid. Again, this is common sense).
The next thing of immediate interest is the board’s background music (hit the ‘Music’ tab). You can select any valid media type for this to be played as background music on the board. Well, what’s a valid media type?
The Toolkit internally can play WAV, MIDI, MP3, MOD, XM, IT and other tracked music files. For any other media type, it will ask the operating system to play the file. If there is a program installed that can play that particular type of file, then that program will be used to play it.
If a player enters a board and the selected song is already playing, it will continue uninterrupted. Otherwise, the new song will be played. All songs are looped forever (they play over and over again).
The next thing to look at is the ‘Battle Options’ tab. This allows you to specify whether or not fighting is permitted on this board. For some boards, you may wish to have players never get into fights (like in a town), but for others (a cave) the possibility of fighting should be open. If you want fights to be allowed, specify this by clicking in the check box.
If fighting is permitted, then you have to fill out two other things. First of all, you will have to fill out a Skill level. The skill level of the board is any number that you specify. This just means that if the skill level is 1, then the player can only fight enemies who are defined to be of skill level 1.
So, at the first of the game, you will want simple enemies, but by the end, the enemies should be more difficult. Adjusting the skill level allows you to control this. For more info on enemy skills, see the “Edit Enemy” section.
The other thing that you have to fill out is the Board Background File. This is the filename of a background file (*.bkg) over which the fight will take place. When the fight starts, the player is magically whisked away to the fight screen, and the Background File defines what that screen looks like. So, if your board is in a mountainous region, you’d want the background to have mountains on it. For more info on this, see the “Edit Background” section.
Hit the ‘Size’ tab to resize the board. The board can be really huge depending on the number of layers you want to use.
The ‘Progress’ tab allows to disable saving from this board (so the player won’t be able to save his progress on this board).
The ‘Day/Night’ tab allows you to enable day and light settings for this board. You will see later on (in the “Main File Editor” section) that your game can have day and night. This section of the Board Info screen lets you turn day and night on for the board. Also, if day and night is turned on, you can set a custom board skill and background for nighttime (to fight harder enemies in the dark!).
Something else that you can edit from this screen is the “Board Constant Value” list. This is a list of ten numbers that the board saves in special variables to be used by RPGCode programs. For more information on variables and the constant values, see the section on “Programming in RPGCode”, specifically the “Reserved Variables” subsection.
The last thing that you can edit on this screen is the “Board Layer Titles”. These are the names of each of the eight layers on the board, and will be displayed when the player enters the board. The board’s layers will be discussed more later on.
Board Background
This option allows you to set the background colors and graphics of the board and its border. When you select this option from the menu, a new window will pop up.
You can specify what images will be placed on the board and its border by clicking on the buttons provided. Alternately, you can also select the color of the border and the board’s background here as well.
If you select a graphic that is larger than the display area for the board background, the image can be parallaxed. If parallaxing is enabled for your game, it will be used as a parallaxing background image (see more on parallaxing in the “Edit Main File” section).
Set Player Position
This is tremendously important if you are editing the first board of the game. Otherwise, it’s not very important at all. This allows you to specify where on the board the player starts. If you do not set this, the player will not be shown on the board when you play the game! (but only for the first board).
Just select this from the menu, and then click on the location where you’d like the player to start.
Playing with Light
Color is everything when you are designing nice graphics. And along with color goes proper lighting and shading effects. One of the Toolkit’s greatest advantages is its ability to allow you to change the lighting effects on any tile on your board.
The simplest way to change the lighting effects of your tiles is to move the ‘Tile Lighting’ slider bar at the top of the screen. This allows you to adjust the amount of white light cast on a tile. When you make it negative, the tiles get darker. When you make it positive, they get lighter, and when it’s zero, the tiles are the way they were created.
When you lay down tiles after adjusting the light level, you will see that they are shaded or lightened according to the current light level. This is especially good for making shadows. I generally put the Ambient Level down to -30 to lay down tiles to be used as shadows, then set it back to normal for anything outside of the shadow.
It takes longer to draw many tiles of different shades, so if you are making shadows, try to keep them all at -30, or some other constant level. Not only will it look more realistic, but your boards will draw faster as well.
Using the ‘Tile Lighting’ slider bar is good for most lighting effects, but occasionally you will want to add different colored light and other effects to the board.
For the advanced options, select the “Board Lighting” menu at the top of the screen. This menu has the following options:
Ambient Effects
Light Color
Spot Lighting
These are explained below...
Ambient Effects
This allows you to set an overall lighting effect to the entire board. When you select this option, a new menu will pop up giving you a few different ambient effects to choose from. When you select one and hit “Apply”, the board will be shaded differently.
Light Color
By selecting this, you can specify the color of the light. You just have to edit the red green and blue components to create the desired light color. Now when you lay down tiles, they will have this light color applied to them.
Spot Lighting
This feature allows you to apply a ‘spot light’ to the board. That is, a number of tile will be shaded a certain color to create the illusion of a spotlight. The light fades away as it gets further away from the source.
Before even thinking about using a spot light, you should have a complete board made and you should have it saved. That way, if you don’t like the spotlight, you can use the saved copy.
The next thing you must do is select a light color. Do this by selecting ‘Light Color’ from the Lighting Effects menu. OK, now we’re ready for a spotlight! Select this option from the menu.
This will open up a new window. This window allows you to set the spot light options. First of all, you’ll want to turn spot lighting “On”.
Next, specify the radius of the spotlight. This determines how large the spotlight will be (since a spotlight is circular, this is the radius of the circle, in tiles). Now specify the light’s fade constant. This is the amount of fade the light has as it gets further away from the source. A good fade constant is something between 10 and 20. Now just hit ‘OK’.
Now you can apply your spotlight. Just click on the board where you wish to place your spotlight, and now hit ‘Redraw”. The spotlight has been applied!
Before editing the board more, make sure you turn spot lighting off!
Gradients
A final way to shade your board is by using gradients. You can create a gradient by hitting the Gradient button in the board editor (8th from the left). This will pop up a new window asking you what colors to use for the gradient. The two colors you choose will fade into each other across the length of the gradient.
Once you have chosen your colors and hit ‘OK’, you will be asked to click the top-left and bottom-right corners of the gradient on the screen. Once you have done this, the board will be redrawn with the new gradient shading.
Layering
The RPG Toolkit allows you to make use of up to 8 board layers. What’s this all about? Well, basically, a board is not limited to merely one flat surface. Rather, you can think of a board as being a three- dimensional surface, with 8 levels of height.
So far, we have been working exclusively on layer one. However, there may come a time when you wish to use more layers on your board. When would you do this? Well, let’s say that you make a board that is a jungle scene. Perhaps you would like your player to be able to climb a tree and walk about on the branches above the rest of the board. So, you could use the layering feature to accomplish this.
 Layering can be used for many
more things, though. These range from
blending graphics to creating ‘airships’ that your player can use to fly above
the landscape.
Layering can be used for many
more things, though. These range from
blending graphics to creating ‘airships’ that your player can use to fly above
the landscape.
Let’s start with the simplest application of layering, though—using it to represent multiple levels of height on your board. First of all, you will have to create a board on layer 1. Once that’s done, change your tile type to ‘Stairs to layer 2’ and lay down that type on a certain tile.
Now, when your player steps on that tile, he or she will be transported onto layer two. This just means that the player will no longer use the tile type restrictions that are found on layer one—instead, he will use the restrictions placed on layer two.
OK. So now you have created a way for your player to actually get onto layer two. Now, notice the drop down box at the top right of the board editor that says ‘Layer One’. Change this to ‘Layer Two’.
If all went well, the screen should go white. Don’t worry! Your board hasn’t been erased! You are now looking at layer two, which has nothing on it. If you want, you can switch back to layer one to see that I’m telling the truth.
Anyway, now that you are on layer two, you can edit it much as you would layer one. However, before you do this, it is a good idea to hit the ‘Draw all layers’ button. This will make layer one visible to you while you edit layer two.
First things first—change the tile type to ‘stairs to layer 1’ and place a tile with this type in the same location as that stairs you placed on layer 1. Now, when your player is on layer one, and steps on the stairs, he will be transported to layer two. When he steps on the stairs again on layer two, he will be transported back to layer one.
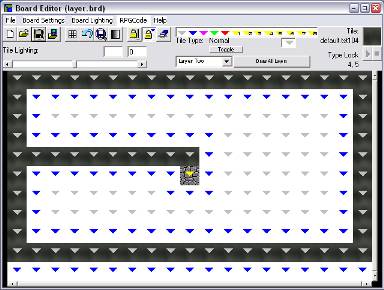 The second layer should just be
something like a ledge—something that hangs over layer one and which the player
can walk on. It would be stupid to fill
up the screen so as to completely obscure layer one. Also, around the edges of the ledge, you should make solid tiles
so that the player doesn’t walk out into empty space, which will give the
effect of ‘walking on air’.
The second layer should just be
something like a ledge—something that hangs over layer one and which the player
can walk on. It would be stupid to fill
up the screen so as to completely obscure layer one. Also, around the edges of the ledge, you should make solid tiles
so that the player doesn’t walk out into empty space, which will give the
effect of ‘walking on air’.
When you are done with layer two, you can hit ‘Draw all layers’ to see how the whole thing looks.
This is the most basic use of layering, and it is quite useful. However, there is another little trick that you can use layering for that will reduce the amount of time you spend drawing tiles. This is something which layering was never really designed to be used for, but it works, and a number of games on the internet have used this little trick…
 Let’s say that you are drawing a
scene on which there are grass tiles, but there are also trees that have grass
behind them. In order to give the
desired effect of having the grass underneath the tree, you could blend the
tiles together with the ‘Layering’ option in the Tile Editor. However, there is a better way.
Let’s say that you are drawing a
scene on which there are grass tiles, but there are also trees that have grass
behind them. In order to give the
desired effect of having the grass underneath the tree, you could blend the
tiles together with the ‘Layering’ option in the Tile Editor. However, there is a better way.
What you can do is lay down the grass tiles on layer one, then switch to layer two and lay down the tree tiles over top of the grass tiles. As long as the tree tiles have transparent portions, you will see the grass through the trees. When you hit ‘draw all layers’, you will see how this works.
An important note: make sure that you set the tile type of the grass with the tree tiles above it to ‘solid’, otherwise you character will walk underneath the trees.
Also, if you are putting the trees over more than one type of tile on your board, you will have to use some more trickery to make it work properly. Let’s say you had grass and dirt on your board, and you wanted trees on top of both. You have to change the lighting effect slightly between the trees on the grass and the trees on the dirt in order for them to draw properly. This is because the Toolkit will make a blind copy of the tree tiles over the whole board, grass and all. If you set the tree tiles that are on top of the dirt to ambient light level 1, it will force the Toolkit to redraw the tree tile over the dirt, and it will be barely noticeable to the eye.
RPGCode
 One of the Toolkit’s most
important features is its built in programming language, RPGCode. RPGCode lets the character talk to and
interact with other characters in the game, as well as much, much more. Refer to the RPGCode section of the manual
for a comprehensive tutorial on how to use it.
One of the Toolkit’s most
important features is its built in programming language, RPGCode. RPGCode lets the character talk to and
interact with other characters in the game, as well as much, much more. Refer to the RPGCode section of the manual
for a comprehensive tutorial on how to use it.
In order for RPGCode programs to be executed, the player must have to opportunity to run them from the board. And it is in the board editor where you set this up.
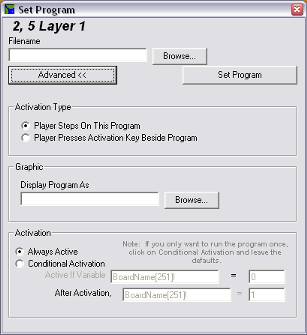
The Toolkit works by running RPGCode programs when the player steps on certain tiles. We have to tell it which tiles run programs. In order to do this, click on the RPGCode menu, and select ‘Set Program’. Now, click on the tile upon which you wish to place the RPGCode program. This will cause a new menu to pop up.
Now, the only thing that you really have to fill out is the Program File Name. You can set this by clicking on the ‘Browse…’ button. If this were the only thing that you filled out, then this program would be run each time the player stepped on this tile.
There are other options that will let you specify exactly when this program will get run and when it will not.
Under the ‘Activation’ subheading, you can change the program to be ‘Conditionally active’. That is, it will only be run if a certain variable is equal to some value. You should probably change this variable name to something more descriptive. For more info on variables, see the RPGCode section of this manual. Also, after activation, you can cause that variable to be equal to something else. If you just want the program to be run once and for all time, just leave the defaults.
Next, you can change the ‘Activation Type’. By default, the program is activated simply by the player stepping on it. This is usually best for doors and things. But you can change it so that it will activate if the player presses the ‘Activation Key’. This is a key on the keyboard that is used to perform general function. When the player is facing the program and this key is pressed, the program is run. For more info on the activation key, see the Main File section of this manual.
Also, you can specify a graphic for this program. If the program is conditionally active, this graphic will not be displayed if the program is not active.
You need to use programs when placing doors on the board. You must use the RPGCode command #Send to do this (or you can use a Warp tile to auto-create the program). For more info, check out the RPGCode section…
Items
Similar to RPGCode programs, Items can also be placed on the board. Items are a bit different, however. An item is pretty well anything that you want it to be. It can be an actual item that your character carries with him, but it can also be a town peasant wandering around a village.
If you want to place characters that walk around on your board, you have to do this with items (see the Item section for more info). In order to lay down an item, click on the ‘RPGCode’ menu, and select ‘Set Item’. From here on in, it works almost identically to setting an RPGCode program. I’m sure you’re smart enough to figure it out.
Warp Tiles
A warp tile is a tile that send the player to another board when he steps on it. You can use a warp tile to create doors. To create a warp tile, select ‘Set Warp Tile’ from the RPGCode menu. Then click on the tile where you’d like to put it. This will pop up a new menu asking you where the tile should take the player. Fill in the board and the coordinates and hit ‘OK’. This automatically creates an RPGCode program for you that will act as a warp tile.
Edit Character
 The character editor allows you
to create players that you can use in your games. A character usually takes a lot of work to make. This is because of all the walking graphics
you have to make for it. But we’ll talk
about that in a bit. First of all,
let’s get to the basics…
The character editor allows you
to create players that you can use in your games. A character usually takes a lot of work to make. This is because of all the walking graphics
you have to make for it. But we’ll talk
about that in a bit. First of all,
let’s get to the basics…
Player Stats
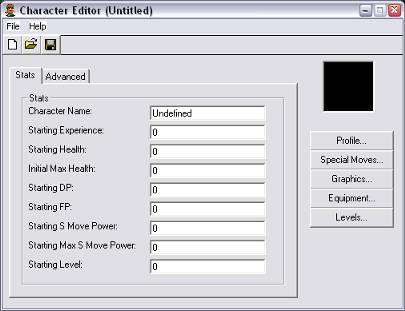
Aside from a nice set of graphics that move around your screen, the player is a creature that contains a lot of information. After all, the player can fight, move around, talk to people, etc. How can we determine how strong he or she is in a fight? How can we determine how healthy he or she is? Well, on the main window of the Character Editor, we can set up the most important part of the character—the statistics. Don’t shy away in fear. This is actually quite painless.
Really, you only have to do a few things to set up the statistics of the player. First of all, type the player’s name in the ‘Character Name’ field.
If you hit the ‘Advanced’ tab, you will see that a bunch of things were just filled into boxes for you. These are variable names. They can be accessed and changed with RPGCode commands. If you are interested in this, skip ahead to the RPGCode section. Otherwise, don’t worry about it—you don’t have to know anything about RPGCode to create a character. Like I said, it’s all automated now.
Now, all you have to do is fill out several of initial values. These are values that the player will have when he or she first joins the game. The first option is the starting experience value (XP). In an RPG, experience is a measure of how many fights the player has been in. As the player fights more and more and gets further into the game, the experience level also increases. The experience level can be used to determine if a player can do particular moves, and it also determines when the player’s skills are upgraded. You can probably leave this value at zero, since the player has had no fighting experience when he or she starts the game. You can, however, change this if you wish. You may wish to if this is a player that joins the game far into the story. Generally, these characters start with a higher experience to match the other characters in the game.
The next value to fill out is the Starting Health value (HP). Each player has a health level—when that level reaches zero, the player is dead. So, in a fight, the higher the level of health that a player has, the better off he is. For a beginning character, 100 is a nice round value to start off with. Following this is a Maximum Health Value. You should probably set this at 100 as well. The maximum health level ensures that a player starting the game doesn’t get a health of 99999999999, or something, which would make him virtually invincible. The maximum health increases as the player’s experience increases.
Next is the Defense Value (DP). This is a value, which determines how well a character can defend himself. For example, if an enemy attacks the player with an attack level of 100, and the player has a defensive level of 40, then the player will only suffer 60 damage. At the start of the game, a small number like 10 is appropriate.
Next is the Fight Value (FP). This is the value that determines how powerful the player is in a fight. If the player attacks an enemy and has a fight value of 200, and the enemy has a defensive value of 10, then the player will inflict 190 damage on the enemy. For the start of the game, a value like 60 is good.
Next is the character’s special move power level. This determines how much special move power (SMP) the player has. The special move power is required to do special attacks, like magic attacks or healing moves. The more SMP a player has, the more he or she can use these special moves. A good starting value is 50, but if the player is a key magic user, then the value should probably be higher. Also, you must fill out the maximum SMP value. This is similar to the Maximum HP value.
Finally, you have to specify the player’s initial level. Level 1 is a good starting point. As the player builds experience, the Level will increase. Each time the level increases, the max HP, max SMP, FP, and DP also increase. For a player at the start of the game, like I said, a value of 1 is good. For a player that joins the game later on, a higher value would be appropriate.
Player Graphics
After the stats, the next most important thing about a character is its graphics. Without the graphics, you wouldn’t be able to see the character on the screen! This is the most time consuming part of creating the character, and is one of the more time consuming parts of using the Toolkit.
Profile Image
The simplest graphic you can assign to the character is the profile image. The profile is the image that is show in the main menu when you select the character during the game. This is usually a picture of the player’s face.
The profile image can be a standard tile, but it can also be BMP, GIF or JPG format. In the last three cases, is must be 64x64 pixels in size. I suggest you use one of the last three, since the image would be much nicer looking.
To set the character profile, just hit the ‘Profile’ button on the left side of the window, and select the graphic filename you wish to use.
Walking Graphics
 The walking graphics are the
frame by frame shots of the character for each movement he or she makes.
The walking graphics are the
frame by frame shots of the character for each movement he or she makes.
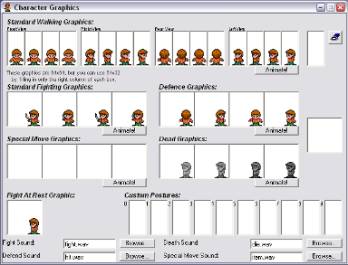
You can edit the player graphics by clicking on the ‘Graphics’ button to the left. After a few seconds, a new window will pop up.
This screen should be initially empty. Your goal is to ultimately fill every one of those empty boxes with a graphic. Like I said—this is time consuming!!! At the very basic level, you must draw at least 16 graphics just for the basic character animation.
Well, let’s stop worrying and just do it. At the top of the window are rows of boxes underneath a heading called ‘Standard Walking Graphics’. Each of these boxes represents a frame of animation in the character’s walking set.
The characters in the Toolkit have up to 4 frames of animation for each direction that they walk. You will notice that the walking graphics are grouped into four groups of four. Each group is intended to be the animation set for the character walking in a different direction.
Each frame is 64x32 pixels in size (that’s two tiles stacked on top of each other). You can create tall characters by composing their graphics of two tiles each.
The first set is ‘Front View’. This animation set should be the one that the character does when walking south—he is facing you. In order to set graphics for each frame of animation, just click in one of the frames and you will be allowed to select a filename (it matters whether you hit chick the top or the bottom of a frame, as this will allow you to define one of two tiles for the animation frame, since players can be composed of two tile per frame).
Probably, you will have to leave the character editor for the time being and make a bunch of graphics in the tile editor. There are ways that you can limit the amount of drawing you have to do. Notice that the left and right view are complete opposites of each other—you just have to draw one set, then flip each tile with the tile editor to get the next set. There are other shortcuts possible using the flip tool in the Tile Editor.
Once you have filled out all 16 boxes, hit the ‘Animate!’ button to see your character walking. Great! Now you’ve got yourself a character that can walk around the screen.
There are some other graphics that you can fill out here, too. You can leave them for now, but eventually you’ll have to fill them in. All the other graphics have to do with the fighting animations for the character. Since you haven’t made any fighting stuff yet, you can ignore them. But you will have fights eventually and you won’t be able to ignore them any longer.
So, there are four frames of animation available for each action possible in a fight. The fighting graphics should have the player doing something like swiping a sword. The defense graphics are used when the player gets hit. The special move graphics are used when the player uses a special move. The death graphics are used when the player dies.
The ‘At rest’ graphic is the graphic used when the player is doing nothing during a fight.
Finally, there is one more set of graphics. The ‘Custom Postures’. There are 10 available slots for this. Custom postures allow you to create tiles for the character doing things like nodding his head, or whatever. These custom frames can be accessed using RPGCode to create custom actions. See the RPGCode section for more details.
Fighting Sounds
Also of interest in this screen are the fighting sounds. These are at the bottom of the screen. Here, you can specify a WAV file to be played when the player swipes his sword, gets hit, dies, or uses a special move in a fight sequence. To change them, just click in the boxes beside each description.
Special Moves
 In a fight, the character can
attack in a few different ways. He can
use his standard physical attack (i.e. Using a sword, or even a fist). Or, he could use an item to hurt his enemy
(like poison, or a bomb). But he can
also use Special Moves.
In a fight, the character can
attack in a few different ways. He can
use his standard physical attack (i.e. Using a sword, or even a fist). Or, he could use an item to hurt his enemy
(like poison, or a bomb). But he can
also use Special Moves.
Special Moves are a form of special attack that the player can perform that is usually more powerful than standard attacks. A special move might be a ‘magical’ style attack. It could also be some special fighting style, like martial arts. Whatever the case, a special move is just that—special.
In a little bit, I will explain how to actually create these special moves, but for now we’ll see how to set the character up so that he or she can use them. To edit the character’s special moves, click on the ‘Special Moves’ button in the Character Editor.
This will open up a new window. First of all, if you wish to let the player use special moves, click on ‘Yes’ where is says Does this character use special moves?
Next, you must give the special moves a ‘Name’. In the box where is says ‘Official Name of Special Move’, type in the name of the special moves. This is usually the name of a certain class of special moves (i.e. White Magic, Martial Arts, etc.) The name can be whatever you want, but it should fit the special abilities of your character.
Once those things are out of the way, we can actually get down to selecting those moves which the player can do. There is a list below, with slots for up to 200 special moves. Just click on one of those slots, and hit ‘Change Special Move’. This will open up a file menu, where you can select a special move. Like I said, we will be making special moves later on, but once they are created, you can select them here.
You can set it up so that characters can only do special moves once they have gained enough experience to do so. Do this by first clicking on the special move slot you wish to edit, and then hit ‘Special Move Info’. This will open up another small menu.
In this new window, you can set the conditions under which the character can use this move. For example, let’s say you had a character that could use fire, but could only use it if his experience was at least 800. Well, if you put 800 in the box, then that’s how it will work.
Important: You can set a minimum experience, but the three conditions in this menu still have to be set. For example, you could set the minimum experience to be 800, but if the minimum level is still zero, then the player will still do this move, since his level will always be higher than zero. Make sure you set the other values to impossibly high amounts, so that only the condition you want met is used to determine if the player does the move or not.
The variable and its condition is a way to add a move to a player thorough RPGCode. Here you can specify a numerical variable to be checked. If that variable equals a certain value, then the player can do the move. For more info on this, see the RPGCode section.
Equipment
 In a fight, a character can wear
certain equipment that will improve his or her fighting and defensive ability. It stands to reason that a player wearing
armor should sustain less damage than a player who is just wearing a leather
coat. In the character editor, you can
specify what body locations you can equip items on.
In a fight, a character can wear
certain equipment that will improve his or her fighting and defensive ability. It stands to reason that a player wearing
armor should sustain less damage than a player who is just wearing a leather
coat. In the character editor, you can
specify what body locations you can equip items on.
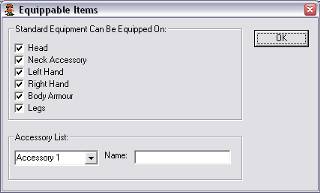
In the character editor, if you click on the Equipment button, a new window will open up.
This window is pretty simple. It allows you to decide what body parts equipment can be worn on. If you want your character to be able to wear a hat or a helmet, make sure ‘Head’ is turned on.
Also, there is an accessory list. This allows you to add body parts that may not be there. For example, you could add ‘Ring Finger’ to the list to allow the play to equip a ring. There are 10 accessory slots.
Levels
Setting the players level attributes sort of goes hand in hand with the player stats. But it’s a little simpler. When the player’s experience increases, it makes sense to reward the player with power ups of health and fighting power. As already discussed, that is what levels are for. When the player reaches a new ‘level’ of development, his or her hp, dp and fp increase. If you click on the ‘Levels’ button in the Character Editor, a new window will pop up.
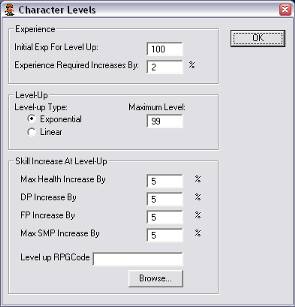 There are some important things
in this menu. First of all is the
‘Initial Experience Required For Level Progression’. This is the amount of experience the player must gain before
progressing to the next level. If the
player starts off at level 1, a good value for this is 100. This means that the player will have to gain
100 experience points before progressing to level 2.
There are some important things
in this menu. First of all is the
‘Initial Experience Required For Level Progression’. This is the amount of experience the player must gain before
progressing to the next level. If the
player starts off at level 1, a good value for this is 100. This means that the player will have to gain
100 experience points before progressing to level 2.
The box that defines what the increase in the required experience is also very important. As the game progresses, each enemy should give progressively more experience (because they are more difficult). It wouldn’t make sense if an enemy gave the character 1000 experience, and the player always needed 100 points to progress—the player would increase by 10 levels every battle! In order to offset this, the experience required for progression should increase as levels increase.
The value you specify here is the percentage by which the required experience increases from one level to the next. In other words, if you set this value to 10%, and the initial increase amount is 100, then once the character has made it to level 2, the experience required to get to level 3 will be 110 points. Then the experience required to get to level 4 will be 121, etc. A value like 10 is good. The default 2% is also good, but it may allow level progression to be too quick. Really, this depends upon the length of your game. The higher you make the number the longer your game will have to be to balance the extra time required by the character to progress his level.
Next you can specify what the maximum level is. The player can’t increase forever, otherwise you might have an invincible character! 99 is used by most RPG games.
Next you can specify the percentage by which the max hp, dp, fp and spc power increases when the player reaches a new level. A value like 10% is good for this. A word of caution: make sure the percentage is high enough to actually make a difference. For example, let’s say the player’s hp was 60, and it was to increase by a measly 1% when the level increases. 1% of 60 is 0.6 points. The Toolkit will round this down to 0. So the player’s health will NEVER increase! If the value is set to 10, then the player will go from 60 hp to 66 hp when his level increases. Much better!
Finally, you can specify an RPGCode program to run when the player levels-up. See the RPGCode section for more info on this.
Edit Enemy
Now we move into the darker realms of the RPG. The enemy. So far, we have created a character, decked him out with all the necessities for a big fight. But what has he been preparing for? Well, it’s time to create his worst nightmare…
An RPG is not about fighting. RPG’s generally are more of an ‘interactive story’. Fighting is a large part of that, but it is not the central feature as in most action games. An RPG’s fighting system is what I call ‘passive action’. Whereas in an action game, the player is forced to fight because an enemy is coming towards him, in an RPG, the player is usually ‘attacked’ by organized parties of enemies. You don’t see the enemies coming. Rather, when you are attacked, you are swept away to a battle screen where the fight occurs.
In an action game, there is very little strategy. Usually, your goal is to whip out your biggest weapon and load your enemy full of bullets. In an RPG, a fight is far more strategic. While in an RPG, you can rip an enemy to pieces with an especially powerful move, this is usually not done because the players need to conserve their energy. Fights occur in groups—there are usually a team of enemies and a team of good guys. Each individual in each group generally has its own specialties.
Enemies can be very diverse in the Toolkit. They can range from a wimpy little rat to a madman with the power to destroy the earth. And size doesn’t matter. Why not give the rat the ability to destroy the earth? The player wouldn’t see that coming!
Creating an enemy is very similar to creating a character. The only difference is that the computer controls an enemy, and since the player is only concerned with the enemy until it is dead, there is no need to bother with things such as level progression and such with an enemy. In other words, an enemy is a flash in the pan. While you may encounter the same enemy more than once, it never gets more powerful, like your characters do. The issue of enemy strength is dealt with as your character moves from one area to another. At the first of the game, the enemies should be fairly easy. As the player moves out into the world, the enemies should be more difficult.
In the final cave or dungeon, the player shouldn’t encounter enemies from the start of the game. When the player moves to a new area, the old enemies stay there. So, the player is always encountering new enemies. Which means we have to make lots of enemies. And that’s what the enemy editor is for.
Basic Info and Fighting Conditions
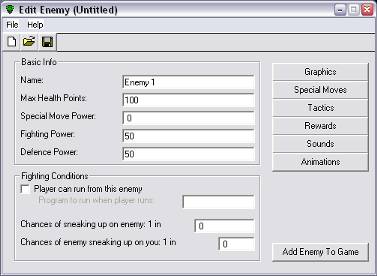 To start off with, click on
‘Edit Enemy’ in the main menu to open up the enemy editor window. The immediate slots in this window allow you
to edit the most basic aspects of the enemy.
Fill in the enemy’s name, HP, SMP, FP and DP (for a detailed explanation
of these stats, see the Character Editor section).
To start off with, click on
‘Edit Enemy’ in the main menu to open up the enemy editor window. The immediate slots in this window allow you
to edit the most basic aspects of the enemy.
Fill in the enemy’s name, HP, SMP, FP and DP (for a detailed explanation
of these stats, see the Character Editor section).
Since an enemy is entirely automated, the system takes care of these values for you and you don’t have to worry about them again after you have entered them here.
In the Fighting Conditions box, you can specify a few other options that define how a fight will occur. First of all, you can tell the Toolkit whether or not the player can run from the enemy. If so, click the box. You can also specify an RPGCode program to be run when the player runs away. This is useful depending upon the strength of the enemy. If the enemy is a boss, your players shouldn’t be able to run away from him. Otherwise, it’s usually ok to allow it.
The next two options, the Chances of sneaking up on the enemy and on you define how accurate the enemy’s and players’ hits are. You can enter a value here that specifies the odds of a critical hit occurring. A critical hit is a hit that is not affected by the defense power of the target (in other words, a critical hit on a player is taken as if the player were wearing no armor, thus increasing the hit power significantly).
Enemy Graphics
You can edit the enemy’s graphics by hitting the ‘Graphics’ button in the Enemy Editor. This will pop up a new window that will let you draw the enemy. This small editor is very similar to the board editor, except you can resize the enemy up to 19x7 tiles. You could draw the enemy this way, constructing it entirely from tiles, but a better option is to import a bitmap, GIF or JPEG image and convert it into an enemy graphic.
This is really easy to do. Just click on the ‘Import’ button, and a new screen will pop up. Here you can click on ‘Open Graphic’ to open the graphic you wish to import. You should also click on ‘Get Transparent Color’ and click on an area of the graphic that should be transparent when the graphic is imported.
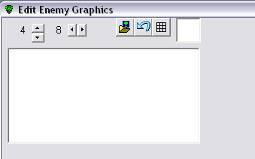 Finally, just hit ‘Import
Graphic’. You will be asked to choose a
filename to save the converted tiles into.
This is a tileset (in .tst) format.
You can make a tileset called enemy.tst, and save all your enemy tiles
into it, if you want. Anyway, once this
is done, the tiles will be saved into the tileset, and you will return to the
enemy graphic editor. Hit ‘redraw’ and
resize the image as necessary, and there you have it—an enemy!
Finally, just hit ‘Import
Graphic’. You will be asked to choose a
filename to save the converted tiles into.
This is a tileset (in .tst) format.
You can make a tileset called enemy.tst, and save all your enemy tiles
into it, if you want. Anyway, once this
is done, the tiles will be saved into the tileset, and you will return to the
enemy graphic editor. Hit ‘redraw’ and
resize the image as necessary, and there you have it—an enemy!
Special Moves and Weaknesses
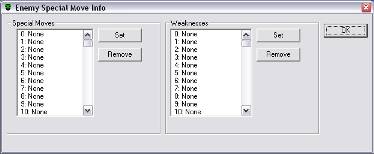 Just like players, enemies can
do special moves. However, enemies can
also have weaknesses to certain special moves.
For example, if the enemy is an ice monster and the player uses fire, it
would stand to reason that the enemy would take more damage from the fire.
Just like players, enemies can
do special moves. However, enemies can
also have weaknesses to certain special moves.
For example, if the enemy is an ice monster and the player uses fire, it
would stand to reason that the enemy would take more damage from the fire.
To edit these characteristics, click on the ‘Special Moves’ button in the enemy editor. This will open up a new window with two lists.
The enemy can do up to 101 special moves and have up to 101 weaknesses. To add a move that the enemy can do, just click on an empty slot and hit ‘Set’. This will open up a file dialog box that will let you choose a special move to add. You can do the same for the weaknesses.
Please note that the enemy will consume SMP each time it uses a special move, so you must give it enough SMP to perform special moves in the first place.
An enemy will take more damage if hit with a move that it is weak against.
Tactics and AI
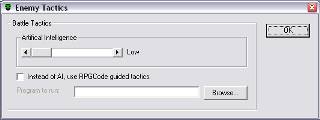 Since an enemy is directed by
the computer, it uses the Toolkit’s internal artificial intelligence system
(AI) to determine what to do in a fight.
You can set the level of intelligence that the enemy has by clicking on
the ‘Tactics’ button in the Enemy Editor.
This opens up a new window.
Since an enemy is directed by
the computer, it uses the Toolkit’s internal artificial intelligence system
(AI) to determine what to do in a fight.
You can set the level of intelligence that the enemy has by clicking on
the ‘Tactics’ button in the Enemy Editor.
This opens up a new window.
You can set the AI level by moving the slider bar. There are four preset intelligence levels:
Low- The enemy is basically random with no real plan of action.
Medium- The enemy will usually use special moves if it can until its SMP gets too low, at which point it will use physical attacks.
High- The enemy will target the weakest player, then it will use a physical attack or a special move at random.
Very High- The enemy will check if its health is low. If it is, it will check to see if it can use any curative special moves. If it does, it will heal itself. Otherwise, it will target the weakest player, then use a special move on that player if it can.
These AI levels will usually be sufficient for most enemies, but occasionally, you may wish to have an enemy act exactly as you want it to. This can be accomplished through the use of an RPGCode program. If you have been following this manual so far, you probably don’t know any RPGCode. That’s OK, since you don’t really have to use this feature right now. If you’re interested, you can flip ahead to the RPGCode section.
If you wish the enemy to use an RPGCode program, you can click on the box, and then select a filename to use.
Rewards
The whole point of fighting enemies is to increase the player’s skill level. Giving the player experience points and money at the end of a fight does this. Click on the ‘Rewards’ button in the Enemy Editor. Here you can specify the amount of experience and gold the player gets at the end of the fight. The player gets this amount for each enemy he or she defeats.
Also, you can have an RPGCode program run at the end of a fight to give the player items, etc.
Animations
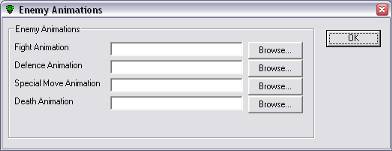 When an enemy attacks or is hit
by the player, you can have an animation run.
These animations are created using the Animation Editor (see the section
on this later on).
When an enemy attacks or is hit
by the player, you can have an animation run.
These animations are created using the Animation Editor (see the section
on this later on).
To set the animations for the enemy, hit the Animations button in the Enemy Editor.
Sounds
Finally, an enemy isn’t much good unless it makes sounds when it attacks, defends, dies, etc. You can modify the .wav sounds that are played when the enemy does certain actions by clicking on the ‘Sounds’ button.
Edit Background
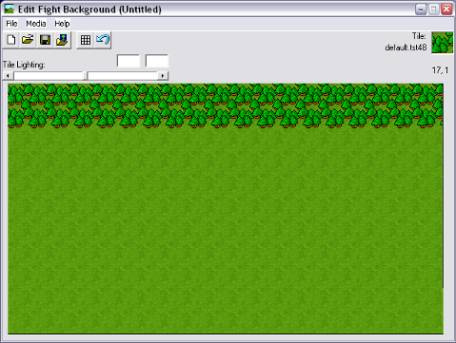 After creating a few enemies,
you must create some backgrounds. A background
is just a backdrop against which a fight happens.
After creating a few enemies,
you must create some backgrounds. A background
is just a backdrop against which a fight happens.
The Background Editor is very similar to the board editor, so I won’t go into the details of actually laying down tiles and things. There are a few other options that a background has, though…
Background Music and Media
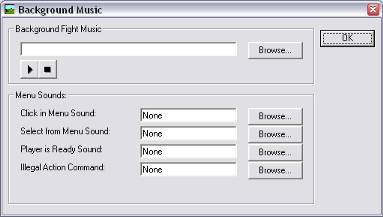 When a fight happens, the player
is whisked away to another screen. The
screen is made up of the background, the enemies and the players. When the fight ends, the player is returned
to the board they were on before the fight.
Since a fight is essentially another ‘place’, it has its own music and
sound effects. If you click on the
Media menu and select Background Music, a new window will pop up.
When a fight happens, the player
is whisked away to another screen. The
screen is made up of the background, the enemies and the players. When the fight ends, the player is returned
to the board they were on before the fight.
Since a fight is essentially another ‘place’, it has its own music and
sound effects. If you click on the
Media menu and select Background Music, a new window will pop up.
This window allows you to select a music file to play while the fight happens. But the other section of this window, the menu sounds, is more interesting.
The menu sounds are the sound effects that are played when the player performs certain actions on the battle menu.
The ‘click in menu’ sound is played when the player clicks on a option in the menu. The ‘select from menu’ sound is played when the player makes a selection. The ‘player is ready’ sound is played when a player is fully charged and is ready to fight. The ‘illegal action’ sound is played when the player tries to do something he can’t. All of these sounds are .wav files.
Since you can specify different sounds for each background, your fighting sequences can become quite varied depending upon the sounds you use.
Background Image
Like the board editor, you can put a .BMP, .GIF or .JPG image in the background of your main image. You can do this here by hitting the Media menu and selecting Background Image. This will let you choose a graphic for your background image.
Some people just use graphics like this for their background instead of making a scene out of tiles.
Edit Main File
 The most important file in your
whole game is the Main Project File. It
pulls all the files you have made together into one whole game.
The most important file in your
whole game is the Main Project File. It
pulls all the files you have made together into one whole game.
To edit a Main File, just click on the ‘Main File’ button on the main option screen. This will open up a new window…
Basic Options
The basic options for your main file are all located in the window. They are explained below:
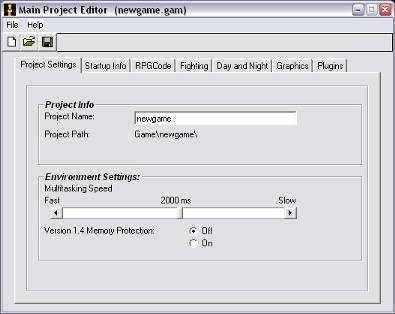
Project Settings
The first tab allows you to edit some basic settings for the project.
You can change the name of your game, and also tweak some other settings. You can leave these alone, but here’s what they do:
Multitasking Speed- This lets you specify the time interval between multitask program updates (whatever that means). Here’s what it boils down to: multitask programs control most characters wandering around in towns. The smaller the interval, the faster they will move. I find that the default is sometimes too slow, so I always set it to the fastest.
 Version
1.4 Memory Protection- This is really not important. If you have made a game with version 1.4 and
are upgrading it to version 2, you should turn this on. If not, it really doesn’t make much difference.
Version
1.4 Memory Protection- This is really not important. If you have made a game with version 1.4 and
are upgrading it to version 2, you should turn this on. If not, it really doesn’t make much difference.
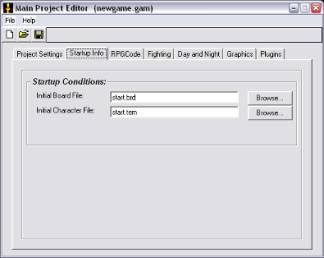
Startup Info
This is a very important section. It sets up where the player starts in the game.
Initial board file- This is the first board in the game. So make sure you put something here, otherwise the player won’t have anywhere to start!
Initial character file- This is the first player to load for the game. If you don’t specify a player, there won’t be any player graphics to move around the screen!
RPGCode
 The RPGCode tab allows you to
specify some RPGCode options for your game.
The RPGCode tab allows you to
specify some RPGCode options for your game.
First of all is the Run Time Program. The Run Time Program is a program you write in RPGCode that can be activated by the player any time during the game by pressing a key. You don’t really need this, because it’s a throwback to version 1. But, it can still be useful. If you want to make a cheat code option, you could have the run time program ask the player for a code, and if it is right, it could give the player a pet monkey or something.
Next up is the Startup Program. This one is important. When you first start the game, a program will be run at the very first, usually showing you the title screen and giving you the option to start a new game or load a saved game. This is done with RPGCode, and here is where you specify which RPGCode program that will be. If you want to see an example of a startup program, open the file START.PRG in the \PRG\ folder (with the RPGCode editor). This is the startup program for the demo game that comes with the Toolkit. You can splice it up and generally mutilate it to fit your needs if you don’t want to write one from scratch.
The Game Over program runs when the player dies. If you don’t specify a Game Over program, the game will show a default ‘Game Over’ message.
Finally, there’s a question: ‘Do you want to use the Internal Menu system?’ Your answer should probably be yes. The internal menu gives the player access to all the fun things like the player’s inventory, etc. If you said no, you would have to write a menu system yourself with RPGCode. And that’s no small task. So just leave it as ‘Yes’.
You can optionally ‘Skin’ the internal menu. This allows you to set graphics to be laid over the menu and the buttons. Hitting the ‘Skin’ button allows you to set these options.
Action Keys
This is pretty straightforward. You can set up some special keyboard keys that do things in your game. Here they are:
Run Time Program Activation Key- This is the button the player has to press to activate the Run Time program. Since you probably won’t have a run time program, you can leave this blank.
Built in Menu Activation Key- This is the key the player has to press to pop up the internal menu. I always use ENTER. But I’m crazy.
General Activation Key- This one isn’t terribly important, but it might be depending upon how programs and things are activated in your game. Remember all the way back in the board editor when you were laying down RPGCode programs? Probably not, but if you did, you would remember that you had the option to have those programs run only if the activation key were pressed. Well, here’s where you can define what that key is. I always use Spacebar. By default, the joystick’s first button is also used as this key (if you have a joystick).
If you hit the ‘More’ button, you can specify addition runtime programs and activation keys.
Fight Options
 In the ‘Fighting’ box, you have
the option to turn fighting on or off for the game. If you turn it on, you must edit the fight settings. Clicking on the ‘edit’ button does this. This will open up the fighting options
window.
In the ‘Fighting’ box, you have
the option to turn fighting on or off for the game. If you turn it on, you must edit the fight settings. Clicking on the ‘edit’ button does this. This will open up the fighting options
window.
It is here that you can add enemies you have made to the game. There is a list of 501 enemy slots to the left. To add an enemy to one of those slots, just double-click on an empty slot. This will let you choose an enemy from a file.
Now, after you have selected an enemy, you must give that enemy a skill level. Click on the enemy, and notice the box to the right. That box shows what the enemy’s skill level is. Just set that skill level to something appropriate for the enemy.
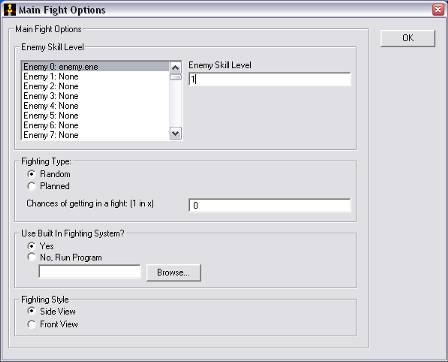 Remember in the board editor
when you set the fight options for your board?
Well, when you turned fighting on for your board, you had to set the
skill level of the board. Well, when a
player gets in a fight on any board, he will fight against enemies of the same
skill level as is set on the board. And
that skill level is determined here in the Main File Editor.
Remember in the board editor
when you set the fight options for your board?
Well, when you turned fighting on for your board, you had to set the
skill level of the board. Well, when a
player gets in a fight on any board, he will fight against enemies of the same
skill level as is set on the board. And
that skill level is determined here in the Main File Editor.
Beyond setting the enemies in the game, you can also set how the fighting system works. First of all, you can choose to use the internal fighting system or not. If you set this to ‘yes’, then all fights will be handled through the Toolkit’s internal fighting system. This is an extremely functional fight system and should be sufficient for most gaming uses.
If, however, you want total control over the fight system, you could write a fight engine in RPGCode. If you do this, set the fight system to use a program, and click on the box to choose the filename. Please note that it is very difficult to create a fight system in RPGCode, and the Toolkit was actually intended to use the internal system.
If you choose the internal system, you can choose between two fighting modes: Side view and front view. The side view is the traditional setting, but you can also use front view if you wish. You really have to just try the two out and use the one you like.
Finally, you have to set how fights are initiated. There are two types of fight initiation in the Toolkit, Random and Planned.
Random- Fights occur randomly. The chance of getting into a fight with each step is determined by the number you place in the subsequent box. 25 is a good number.
Planned- Fights occur every so many steps in the game (i.e., the player will get into a fight every 15 steps). A good number for this is 25 as well, but it makes the game more predictable.
The Fighting Style lets you specify how the players will be placed on the fight screen. The Side View puts them to the right. The Front View puts them on the bottom.
Day and Night
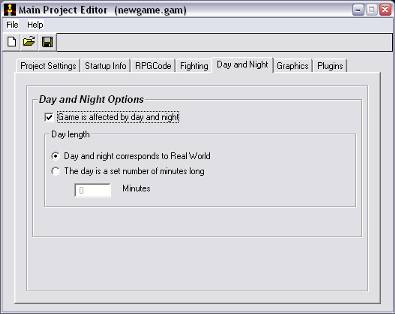 Your game can alternate between
day and night, and this tab is where you set these options.
Your game can alternate between
day and night, and this tab is where you set these options.
If you turn day and night on, then any board that is affected by day and night (see the ‘Board Information’ section of this manual) will be shaded based upon the time of day.
You can set the day length to correspond to the Real World. This means that if it’s dark outside in the real world, it’ll be dark in the game.
Alternately, you can set the day length to be a set number of minutes.
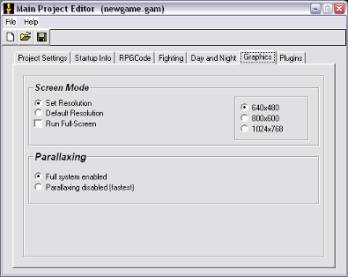 Graphics
This option lets you choose what resolution the Toolkit will use when your game is played. Here are the options:
Set Resolution– The game will run in a resolution you set.
Default Resolution- The Toolkit will run at the current resolution the monitor is set at. If full-screen is turned off, it will run in a floating window.
If Run Full-Screen is turned on, the viewable area will stretch to fit the screen.
You can also choose to turn parallaxing on or off. Parallaxing means that background images on your boards will scroll at a different speed than the board itself. This creates a 3D illusion of depth, and looks really nice.
If you turn this on, try setting the background image on your board to some image larger than the viewable area of the screen. Ten when the board scrolls, the image will scroll at a different rate.
Plugins
The Toolkit can expand it’s abilities by using plugins. The plugins section allows you to choose what plugin you’d like to use. Plugins must be located in your Toolkit2\Plugins folder.
Edit Program
So far, I’ve talked a lot about RPGCode programs. And you probably don’t know anything about RPGCode. Well, now it’s time to get your feet wet.
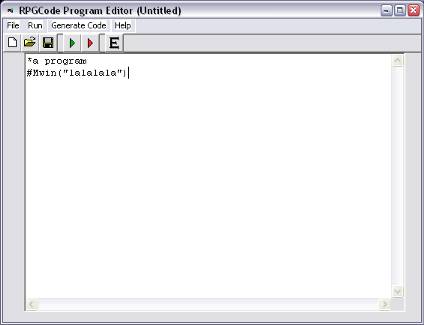 First things first: what is
RPGCode? Well, it’s a programming
language that you can use to get into the guts of the game and do pretty well
whatever you want. Wait!!! Before you go and throw this guide away,
please—don’t be afraid of that term ‘programming language’.
First things first: what is
RPGCode? Well, it’s a programming
language that you can use to get into the guts of the game and do pretty well
whatever you want. Wait!!! Before you go and throw this guide away,
please—don’t be afraid of that term ‘programming language’.
When I designed the Toolkit, I knew that people wouldn’t want to learn an impossible language or a full-fledged language like C (otherwise, you could program a game yourself, right?). RPGCode is VERY easy to use. And I’m not saying that just because I developed it. Ask anyone who knows it—go on the message board on my site and ask. People will tell you that it isn’t really too hard.
I’m not going to teach you how to program here (there is a whole RPGCode guide at the end that will teach you how to program even if you have absolutely no experience).
The Toolkit’s RPGCode editor is basically just a text editor. All RPGCode programs are saved as text files. So, if you want, you could use a text editor instead of the RPGCode editor if you like. There are also a few external RPGCode editors on the Internet (Cyranoid’s VorteX is an example).
Well, let’s begin. Open the RPGCode editor by hitting the button in the main options screen. This will pop up a new window that you can type stuff in.
It works just like any text window in Windows. Ctrl-C will copy selected text and Ctrl-V will paste it.
I will very quickly touch on RPGCode programming here, but keep in mind that the full guide will come later (actually, you could run ahead and play with some commands and stuff if you read it).
Commands… and Stuff
The way a programming language works is by giving the computer commands. The computer will do whatever you tell it to. Go ahead and let that power go to your head, it’ll make you feel good.
In the RPGCode language, each line of text you place in the RPGCode editor is considered to be some form of a command. For example, please type this in the Editor:
#Mwin(“This is a command”)
OK. Now you’ve got one command laid down there. So what? Well, let’s see what it does. If you look at the menu bar up to, you will see a selection entitled ‘Run’. Drop that down and select ‘Run’ from the menu (or, just press F5. I’m sure you’ll get lazy like me and just hit F5 all the time). Now wait…
And wait… Your little RPGCode program will be launched. And what will happen? You’ll probably wait for about 10 seconds while it loads, then you’ll see the text ‘This is a command’ flash before you for about one second then disappear. Then you will be back… Sort of like an out of body experience, eh?
Well, here’s exactly what happened…
- You hit the ‘Run’ command. This launches trans2.exe, which will run your program.
- When trans2 is started, it will begin to run your program.
- Trans2 will look at our program and see the first line--#Mwin(“This is a command”)
- Trans2 will ‘execute’ (run) that command.
- The command #Mwin puts text in a window called the Message Window. In this case, the text is ‘This is a command’.
- That text gets out in the ‘Message Window’.
- Once the text has been printed, trans2 shuts down and returns you to the RPGCode editor.
- Not too bad. Basically, the computer interpreted your command and did something. Your command was #Mwin. As it is, that command opens up the message window and puts text in it. Isn’t that what happened?
Now, here’s a problem—the text just flashed in front of you. No real time to read it, right? Well, you can add another command to your program...
#Wait(a$)
Just put that directly after your first command. It’ll cause the computer to wait for the user (you) to press a key before clearing the message window and shutting trans2 down.
So, now you can put text in the message window with the #Mwin command and force the computer to wait for you to press a key with the #Wait command. If you are really curious as to what the a$ is in the #Wait command, you’ll have to flip ahead to the RPGCode section for a full explanation.
Putting a program to work
OK. What’s the purpose of an RPGCode program? Well, you can basically interact with the player through an RPGCode program. For example, let’s say you wanted to put an old man on a board, and you wanted him to say something to the player when he walked up to him. Here’s a little program to do this:
#Mwin(“Old
man: Hi. Isn’t this RPGCode stuff
great?”)
#Mwin(“Player:
What are you talking about?”)
#Wait(a$)
Now you can save this program. Let’s say we save it as oldman.prg. Now, how do we put this program on a board? To do this, you have to go into the board editor. Lay down a tile somewhere that looks remotely like an old man. Now go up to the RPGCode menu and select ‘Set Program’. Now you can click on that old man, and a box will open up asking you what filename to use. Select ‘oldman.prg’. Now save your board. That’s it! Now, when you play the game and the player steps up to that old man, the file oldman.prg will be run, and the above text will be displayed. Easy, no?
This is how you set any program on the board. And a program doesn’t have to be as simple as the one here. It can be interactive, and receive input from the player. It can display a story sequence. It can do pretty well anything. RPGCode is powerful, and there’s very little you can’t do with it (with regards to an RPG, that is).
Run Options
When you run a program from the RPGCode editor by pressing F5, it will load and run the program with preset defaults. You may not like those defaults. If you want to change them, click on the ‘Run’ menu, and select ‘Run Preferences’. This will open a new window with a few options.
You can select the board that the program runs on, the players that get loaded into memory before the program starts, the font, the message window graphic and the font size.
At your current level of RPGCode knowledge, this may not be terribly useful, but when you start making story sequences and stuff, you’ll find that it really helps to have the proper players loaded into memory and to have them on the right board.
Debugging
 One of the most useful things
that the Toolkit has available to it is the RPGCode debugger. It allows you to modify the way a program
runs while it is running so you can see exactly what is wrong with a program if
it isn’t running properly. To debug
your program, hit Shift-F5. This will
pop up the program in Debug mode.
One of the most useful things
that the Toolkit has available to it is the RPGCode debugger. It allows you to modify the way a program
runs while it is running so you can see exactly what is wrong with a program if
it isn’t running properly. To debug
your program, hit Shift-F5. This will
pop up the program in Debug mode.
The debug window will pop up– it contains your entire program. It will not run the program, though. To step through the program one statement at a time, hit the ENTER key. This allows you to see the exact program flow that takes place while your program is running.
You can modify a line of code by clicking on it and hitting the ‘Modify Line’ button. Also, you can insert and delete lines, as well as add breakpoints (a breakpoint causes the debugger to pop up, even if you set the program running gain with the F5 button).
A useful feature is the variable watch at the bottom of the window.
Using the variable watch, you can see exactly what value a variable contains. Click the ‘Add Watch’ button to add a new watch. It will open up a new window. Just type in the name of a variable to watch. You can modify the contents of the variable with the ‘Modify Variable’ button.
Toggle Step Into toggles step-thru into custom methods. You will learn more about methods later on.
At any time, you may close the debugger and continue execution of the program by pressing the F5 button (if the program encounters a breakpoint, it will pop up the window again, though).
Useful RPGCode Commands
There’s lots of RPGCode commands. And it may be hard to find the ones you need to use. I’ll list a few commands here that you might need when performing certain tasks. This is by no means a complete list. For the complete story, see the RPGCode command reference section.
Conversations
#Mwin -displays text in the message window.
#Mwincls -clears the message window.
#Wait -waits for user’s input.
#Prompt -lets user type something with the keyboard.
#If -for deciding what to do with user input.
Regular board stuff
#Send -send player to another board.
#Fight -start a fight.
#FightEnemy -start a fight with a particular enemy.
#GiveGP -give gold to the player.
Fighting and Special Moves
#Put -put a graphic on the screen.
#Scan/#Mem -flip graphics for animations.
#AttackAll -attack all enemies.
#TargetLocation -x, y coords of target.
Story Sequences
#PutPlayer -put a player on the board.
#Push -move a player around.
#CreateItem -load an item into memory.
#PushItem -move an item around.
There are, of course, many, many, many, many situations that RPGCode can handle. There are only the most common. Like I keep saying, flip ahead to the RPGCode command reference and let your imagination soar (that’s the lamest thing I’ve ever written).
Editing Events
If you don’t want to memorize RPGCode commands, you can create programs using the event editor. This displays an RPGCode program as a series of English events.
 You can edit a program as an
event by hitting the big ‘E’ button in the RPGCode editor. This will display the program as a series of
lines describing what the program does.
You can edit a program as an
event by hitting the big ‘E’ button in the RPGCode editor. This will display the program as a series of
lines describing what the program does.
By double-clicking on a line, you can edit the line individually by filling out some text boxes to indicate what you want the line to do.
Edit Item
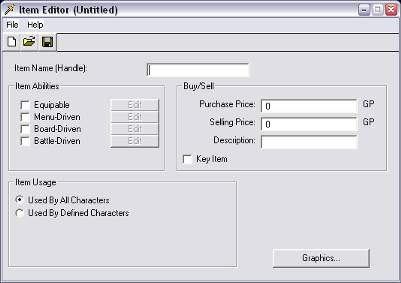 A very important concept in the
RPG Toolkit is the Item. What is an
item? It can be pretty well
anything. It can be a weapon, used to increase
your players’ battle skills, it can be a book, it can be a bomb, or it can even
be an NPC (Non-player-character).
A very important concept in the
RPG Toolkit is the Item. What is an
item? It can be pretty well
anything. It can be a weapon, used to increase
your players’ battle skills, it can be a book, it can be a bomb, or it can even
be an NPC (Non-player-character).
The item is the most varied type of object you will create with the Toolkit. When you open up the item editor, you are given a number of options…
Handle
Similar to the Character Editor, you must assign this item a handle. The handle is the special name you can use to refer to the item throughout the game. Don’t use some strange code for this—if your item is a wooden sword, call it ‘Wooden Sword’. You probably won’t need to know about the handle until you get into RPGCode a little more.
Item Abilities
Like I said, an item can do lots of things. The four check boxes along the side allow you to give your item certain abilities. Here is what each one does:
Equipable
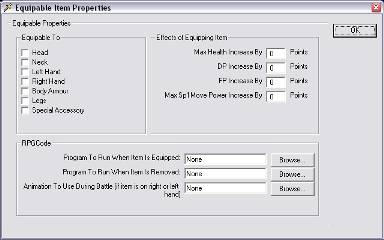 To make the item equipable,
check off the box and then hit the ‘Edit’ button that becomes available. This will pop up a new window.
To make the item equipable,
check off the box and then hit the ‘Edit’ button that becomes available. This will pop up a new window.
An Equipable Item is an item that the player can use as a weapon or as armor during a battle. When the player receives this item, it can be put on the character just as if you were dressing the character.
This screen allows you to specify exactly how this item will affect the player.
First of all, you can tell it where it can be equipped. Remember the Character Editor, with the ‘equip slots’. Well, here are the corresponding entries. Before in the Character Editor you specified which slots could be used by the character. Now, you will tell the item which slots it is allowed to be equipped to.
If the item is a sword, it would make sense that it would only be equipable to the left or right hand. If it were a hat, it should only be equipable to the head. So, depending upon what your item is, specify where it can be worn on the body. You can specify more than one location.
Also, you can tell it to be equipable as a Special Accessory. If you check off this box, you then have to fill out which part of the body this can be equipped to. Remember in the character editor when you could create your own custom slots? Well, let’s say you had previously created a slot called ‘Ring Finger’ on your character. Now, you could specify that your item can be equipped to ‘Ring Finger’.
Next, you must specify the effects this item will have on the character when it is equipped. For example, if the item were a sword, then it should increase fighting power (FP). If it were a shield, it would increase defensive power (DP).
The boxes that follow allow you to specify the number of points each characteristic of the character will gain upon equipping the item. Note that when the item is un-equipped, these special effects will be removed as well.
Also, you could make a cursed item, one that damages the character when equipped. These items would have negative increase values. You could also have some sort of item which gives the player lots of FP, but which takes a lot of HP off. This adds a lot more strategy when the player is trying to determine what equipment they will put on their players.
Finally, you can have RPGCode programs run when the item is equipped/ un-equipped. For a ‘master sword’, you might have a program run which will do something special when the item is equipped.
Menu Driven
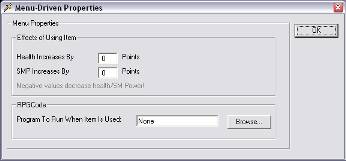 You can also make the item Menu
Driven. This means that you can use
the item from the internal menu of the game.
This is good for making potions and things, which can heal the player.
You can also make the item Menu
Driven. This means that you can use
the item from the internal menu of the game.
This is good for making potions and things, which can heal the player.
This is pretty simple. You just have to fill out the amount by which the player’s health and SMP increase when the item is used.
Also, you can have an RPGCode program run when the item is used. This program can be used to make a little sound or something if you like.
Keep in mind that when you use an item from the menu, it is gone. If you want to make an item which doesn’t do away when used from the menu, you can have it use an RPGCode program which uses the #GiveItem command to give the item back after it gets used up.
Board Driven
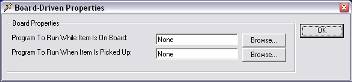 This option is probably the most
used. If you want to make an NPC
(Non-player-character), this is how you do it.
This option is probably the most
used. If you want to make an NPC
(Non-player-character), this is how you do it.
An NPC is just your regular Joe in the game. You know when you play RPG’s and there are stupid little kids running around villages and crazy old men telling you about the time ‘before the Empire took over’? Those are NPC’s.
There are only two things that you have to fill out to make an NPC. First is the program to run while the item is on the board. This is a special type of program called a multi-task program. It’s called this because it runs simultaneously while other programs are also running (other NPC’s) and while the character walks around. This program lets you make the item walk around and do whatever it does on the board.
The Toolkit comes with a program called Wander.prg that causes an NPC to wander around aimlessly. I use it for most of my board driven items. However, you can also write your own RPGCode programs to cause the item to chase the player around, or evade the player.
The other program that you have to declare here is the program that gets run when the item is ‘picked up’. Now, if the item is an NPC, this means ‘when the player talks to the person’. Usually, this program is just used to make the NPC talk to the player (using #Mwin commands). Of course, it can do others things as well.
If your board driven item is not an NPC, then you are probably using it to be an actual item that’s just sitting there on the board. When the player picks it up, something happens, or the player gets that item in his inventory. If you want to make an item which you can pick up, just use the #GiveItem command in the ‘Pick up’ program.
The board editor can override both of these programs. When you place an item on the board, you can specify different multitask and pick up programs. This is good, because if you make an NPC with a bunch of movement graphics, you don’t want to have to make a different one for every character in the game.
Battle Driven
A battle driven item is almost exactly like a menu driven item, except that it can be used in a fight. The options for creating it are the very same as the menu driven style. Battle driven items may include potions (for healing players) and ‘throwable’ weapons (used against enemies). Battle driven items get used up when used from battle.
Also: If an item is equipable and battle driven, and the item is equipped on a player’s right or left hand, then the program that gets run by the battle-driven item will get run each time the player swipes his or her sword (Attacks). In this instance, the item will not get used up, because the player has it equipped.
Graphics
If your item is to be an NPC, it must have graphics. When you click on the ‘Graphics’ button, a window will pop up that is similar to the character editor’s graphics screen.
This window allows you to fill out the walking and at-rest graphics for this item. If your item is board driven and moves around (i.e., it uses programs such as the wander.prg file), it must have graphics (otherwise, how will it walk around?)
Other Options
In the Item Editor are a few other options. First of all is a check box that says if the item is a ‘Key Item’ or not. A key item is an item that the player cannot drop or sell. It is an item that you want the player to keep throughout the whole game.
Also, there is a purchase price and a selling price that you can fill out. Items can be bought and sold in shops, and these fields will determine what the going rate is for this item (these shops are called with the #CallShop RPGCode command).
Finally, you can specify exactly who can use this item. By default, all characters can use the item (if it is equipable/menu/battle-driven). However, you may want only certain players to be able to use certain items. If you select ‘Used By Defined Characters’, you can fill out which characters can use this item (up to 50 characters—you must specify their Handles).
Edit Special Move
Remember in the Character Editor when you gave the character ‘Special Moves’? Well, here is where you create those special moves.
A special move is a specialized attack that a player can use in a fight. It is usually more powerful and drains a portion of the player’s energy or Special Move Power (SMP).
Special
moves can be used for everything from specialized physical attacks to powerful
magical 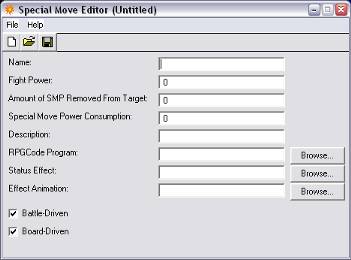 attacks. It’s very easy to make a special move…
Special Move Stats
The first things you have to fill out are the special move stats. These determine how strong the special move is.
The name of the special move is the name that is sown in the battle menu for the move (negative values make the move a curative move).
The Fight Power is the fighting strength the move has, and the amount of SMP removed from the target is the amount of SMP removed from the enemy against which the special move is being used (usually this is 0).
The SMP consumption is the amount of SMP the special move removes from the player when the player uses the move.
The Description is a text description that is shown when the player wants info about the special move.
Special Effects and Uses
The RPGCode program is a program that is run when the special move is used. This is intended to create special effects when the move is used. For example, let’s say you create special move called ‘Fire’. You could write an RPGCode program to show a fireball moving across the screen. This program would be run before the special move took off damage from the enemy.
A special move can have a status effect associated with it. A status effect is a condition a player or enemy gets for a few rounds of fighting that will help them or hurt them (see the “Status Effect” section for more info).
You can set an animation to be played when the special move is used. This is an animation created with the Animation Editor.
Finally, the last two check boxes determine where the special move can be used. Most special moves can be used from a fight. So almost every special move you make should be battle-driven. Also, you can make these moves menu-driven as well, which means they can be used from the game’s internal menu. Curative moves are usually menu-driven also.
Animated Tiles
You can create animated tiles for your game. From the main screen, hit the “Edit Animated Tile” button. This opens the Tile Animation Editor.
Animated tiles can be used to create a moving flame on your board, flowing water, or anything else that is in motion.
To begin, click in the white box. This will let you select a tile for this frame of the animation.
You can hit the Forward button to advance to the next frame of animation. You can set another image in this frame.
Your animation can be composed of as many tiles as you wish. You can set the speed of the animation by adjusting the slider between Slow and Fast. If you hit the ‘Play’ button, you can see the animation in action.
The Ins button will allow you to insert a new frame in between two existing frames. Del deletes a frame.
When you save the tile animation, it will create a file with a .TAN extension. You can use TAN files in the board editor just like you would use regular tiles (they will only animate when you’re actually playing the game, though).
Animation Editor
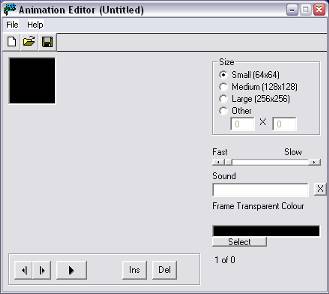 You can create animations
composed of bitmapped images, such as GIF images to use in your game. Mostly, animations are used in battles to
accompany Special Moves or to animate enemies.
Open the Animation Editor by hitting the “Edit Animation” button on the
main screen.
You can create animations
composed of bitmapped images, such as GIF images to use in your game. Mostly, animations are used in battles to
accompany Special Moves or to animate enemies.
Open the Animation Editor by hitting the “Edit Animation” button on the
main screen.
The concept behind the Animation Editor is similar to that of the Animated Tile Editor. You can set an image to a frame of animation by clicking on the black box.
The images are sized according to the specified size of the animation. You can set the size by adjusting the Size attributes to the right.
Each frame of animation can have its own sound effect. This allows your animation to be accompanied with sounds (like an explosion sound for an explosion animation). You can add a sound file for each frame by clicking in the Sound box.
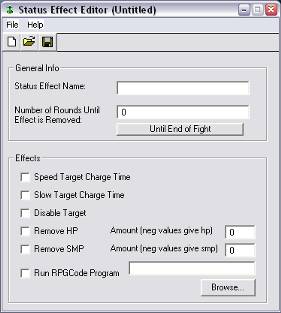 Transparent
Color
Transparent
Color
Each frame of animation should have a transparent color. This is a color in the image that will be ignored, and used as transparent. A distinctive color is usually the best choice (like a bright green, for instance). To set the transparent color for a frame, hit the ‘Select’ button and then click a spot on the image where that transparent color is.
Status Effects
During a battle, a character or an enemy can be affected by a status effect. This is a temporary condition applied to the fighter that will help or hurt in the battle. To create a status effect, hit the “Status Effect” button on the main screen. This will open the Status Effect Editor.
General Info
The basics of the status effect are the Name and the number of rounds in the fight this effect will last. The Status Effect Name will be used when the player or enemy contracts the status effect.
The number of rounds it lasts indicates how long the effect will last. The battle system is turn-based, and a single round includes a chance for all players and enemies to make one move. If the effect is only to last one round, then it will only affect the player once while the player is making a move.
If you set this value to 0, the effect will last during the entire fight. All status effects are removed at the end of a fight.
Effects
The Effects section of the screen allows you to define exactly what the status effect does. These effects are applied to the target player or enemy each round the effect is still valid. The options are explained below:
· Speed Target Charge Time – This increases the speed at which the target player or enemy charges up before they can do their next move.
· Slow Target Charge Time – This decreases the speed at which the target charges up before their next move.
· Disable Target – This completely stops the charging up of the target. This has the effect of ‘freezing’ the player or enemy.
· Remove HP – This lets you specify an amount of HP to be removed each round. If you specify a negative value, the target will gain HP each round.
· Remove SMP – This lets you specify an amount of SMP to be removed each round. If you specify a negative value, the target will gain SMP each round.
· Run RPGCode Program – This lets you specify an RPGCode program to be run each round. This gives you power over what the status effect will do to the target.
Tileset Manager
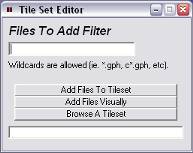 You should use tilesets. The old .gph tiles are fine for getting to
know the Toolkit, but you’ll really be doing yourself a favor by using
tilesets.
You should use tilesets. The old .gph tiles are fine for getting to
know the Toolkit, but you’ll really be doing yourself a favor by using
tilesets.
The tileset editor allows you to create and manage tilesets. But before I begin into that, maybe I should tell you how to make tilesets in the simplest way…
Creating a tileset with the Tile Editor
The easiest and best way to create a tileset is from the Tile Editor. When you make a tile, when you save it, give it a filename, but add .tst at the end of the name. This will create a new tileset with that filename and add the tile into it.
Whenever you want to add new tiles into that tileset, you just have to save them with the name of the tileset itself (i.e., to save into a tileset called cave.tst, when you went to save each tile, save it as cave.tst). Don’t worry—this won’t save over your tileset, instead, it’ll add the tile you are trying to save into the tileset. Pretty easy stuff.
To open a tile from a tileset, you just have to act as if you are opening a regular tile, but instead of selecting a .gph tile, select a .tst file. This will pop up a widow showing you all the tiles in the set. Just click on the tile you want to open it.
If you do all tileset management with the tile editor, you should be fine. But the Tileset Editor allows you to modify a tileset in more ways.
Tileset Editor
The tileset editor allows you to add lots of tiles at once to a tileset. So, if you’ve made lots of .gph tiles, you can put then all into a tileset easily. But first, there are a few things to know about a tileset:
Tileset Characteristics
A tileset has a set detail level, just like a tile. Tiles in the Toolkit can be anywhere from 32x32x16.7 million colors all the way down to 16x16x16 colors. A tileset is the same.
When you first create a tileset, any tiles you add to it from then on must have exactly the same detail level and color depth. This probably isn’t a problem since most tiles you’ll make will be 32x32x16.7 million colors. But be warned: if you create a tileset by adding a 16x16x256 colors tile into it, every tile you add from then on must be 16x16x256 colors.
There is no limit to the size of a tileset. But for your sake, you might want to keep it below 1000 tiles. It doesn’t make any difference in speed for the Toolkit, but it’s easier for us humans to look for an image if it’s not buried along with 1000 other images.
Once you start using tilesets, you’ll probably get addicted to them. I never use .gph tiles anymore, except for very special cases (it’s easier to use .gph tiles in RPGCode, for instance). At the time of writing, tilesets are relatively new to the Toolkit (tileset support only came out 5 months ago), but already there are many tilesets available for Toolkit games, both original and ripped from popular RPG games. You should have no problems finding what you want, and if you can’t find a tileset you want, you can always create one.
Tilesets make importing from other games or game development systems much easier than using .gph tiles. If you ever import graphics from another game on a large scale, you will immediately appreciate the benefits of the tileset.
Adding Lots of Files to a Tileset
Let’s say you’ve got 600 .gph tiles made, but you want to put them into a tileset. No problem. The Tileset Editor allows you to do this in two ways…
Using the File Filter
The quickest way to put lots of tiles into a tileset is by using the File Filter box at the top of the Tileset Editor window. This lets you specify the conditions under which tiles are added.
You are allowed to use wildcard characters. For example, *.gph will add all tiles into the tileset; c*.gph will add all tiles that start with the letter c.
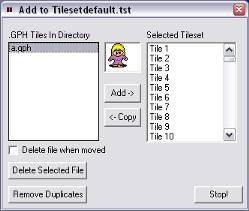 Once you have filled out the
filter box, just click on ‘Add Files To Tileset’. You will be asked what tileset you wish to save the tiles into,
and then they will be put into the tileset.
It’s as easy as that.
Once you have filled out the
filter box, just click on ‘Add Files To Tileset’. You will be asked what tileset you wish to save the tiles into,
and then they will be put into the tileset.
It’s as easy as that.
Adding Files Visually
You can also add files one at a tile to a tileset by browsing the available tiles and then placing them into the tileset.
Click on the ‘Add files Visually’ button, and you will first be asked for a filename of a tileset to add files into. Then a new window will pop up.
This window shows you two list boxes. The one on the left shows you all of the .gph tiles that you have. The one on the right shows you all of the tiles that are stored in the selected tileset.
You can add .gph tiles to the tileset by clicking on the filename and hitting the ‘Add ->’ button. You can copy files out of a tileset by clicking on a tileset tile and hitting the ‘<- Copy’ button.
This window also allows you to ‘Remove Duplicate’ .gph tiles from your tiles directory. When you import a screenshot from another game using the Tile Grabber (see tile editor section), it will create a lot of .gph tiles in your directory. Some will be duplicates (since virtually no image is made up entirely of different tiles). You can hit the ‘remove duplicates’ button to have the Toolkit scan all tiles in your tiles folder and remove any duplicates. Be warned: this option will delete files permanently (but if a file is deleted, there will always be another one that is exactly the same).
Ripping Tiles
There are lots of great RPG’s out there. Maybe you’d like to make a continuation of your favorite game, or just use the same graphics. Well, you can easily import graphics from any other RPG game using the Toolkit. Here’s how I do it:
- I go into the Tile Editor, and select ‘Grab Tiles’.
- I open up a screenshot of the game I wish to import (you can capture the screen of any Windows game by pressing the ‘Print Screen’ button on your keyboard, going into a graphics editor and pasting the image from the clipboard; some DOS programs let you save screenshots; emulated SNES or Genesis games usually have screenshot option in the emulator).
- Depending upon where I got the graphic, I use Batch Import (32x32) or Batch Import (16x16) (Most DOS and SNES games use 16x16 tiles, most windows games use 32x32).
- I am asked to save my tiles. I usually give the tile grabber a filename like the first two letters of the game I am importing.
- Now, the tile grabber will grab all of the tiles on screen. This creates LOTS of .gph tiles.
- Now, I go into the Tileset editor and hit ‘Add files visually’
- I give it some filename.
- Now I hit ‘remove duplicates’. This will remove duplicate tiles from the screen grab.
- Next, I will add the tiles one by one to my tileset visually, or I’ll just go out and add them with the file filter option (much faster), by using ab*.gph, where ab are the first two letters I chose before.
- Finally, I browse the tileset to make sure everything is OK, then I delete the .gph tiles that were created by the Tile grabber (go into DOS and type del ab*.gph, where ab is the first two letters).
Using Tilesets from RPGCode
Tilesets are a little clumsy in RPGCode, but usable. I usually still use .gph tiles in RPGCode, because their filenames are more descriptive. Here’s an example:
In RPGCode, I could type:
 #Put(1,1,”grass.gph”)
To put a grass tile at 1,1. But let’s say my grass tile is saved in a tileset and it’s the 18th tile in that tileset. Here’s how I would use the same command:
#Put(1,1,”tilesetfilename.tst18”)
The 18th tile in a tileset called tilesetfilename.tst is referred to by tilesetfilename.tst18. Pretty easy.
Edit Font
You can create your own fonts for your games. This is a little outmoded, since the Toolkit can use Windows True-Type fonts. But if you want, you can create your own.
When you open the Font Editor, the whole window will be blank. Go up to the File menu and select ‘new’. This will open up the default font for you to edit.
At the bottom of the window, you’ll see all the characters in the font (all 256 ASCII characters). If you want to edit any letter, just click on it. This will show the font in a grid above the list of letters.
Editing a font works a lot like editing a tile, except there are no colors. When you have made a letter and are happy with it, hit ‘Go With It!’ This will make the changes you have made to the font.
Finally, when you save the font, give it some descriptive name (NOT base.fnt, since that’s the filename of your default font).
Using a Font From Your Game
If you want to use your font, use the #Font RPGCode command. You should put this on the first line of your start.prg file (startup program). You must include the .fnt extension.
For example, you could do this:
#Font(“myfont.fnt”)
You can also use True Type fonts. You do this by putting the name of the font in the #Font command. You should put the TTF files in your game’s Font folder so the Toolkit will automatically load the true type fonts for your game.
PakFiles and EXEs
The Toolkit allows you to distribute your game as a large series of files, as you have been creating them, or you can archive all of the files in a game into one large file. This can make distributing games easier for you (you just have to give the other person the one file).
PakFiles
PakFiles are special archives that contain an entire game. You still need to have the Toolkit installed to use them, but they can be convenient if you want to give another Toolkit user your game. PakFiles also combine all of your files together, so no one can get at them or edit them.
 To create a PakFile, click on the PakFile icon on the main screen
(the box with an arrow pointing into it).
This will open the PakFile window.
To create a PakFile, click on the PakFile icon on the main screen
(the box with an arrow pointing into it).
This will open the PakFile window.
On this screen, you just have to select a filename for your PakFile, then you can hit the ‘Create PakFile’ button. The Toolkit will handle the rest.
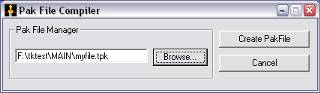 When the PakFile is done, you
will have a file with a .TPK extension.
You can run this file with trans2.exe the same way you would run a .GAM
file (see the section on playing your games for more info).
When the PakFile is done, you
will have a file with a .TPK extension.
You can run this file with trans2.exe the same way you would run a .GAM
file (see the section on playing your games for more info).
EXEs
The Powerhouse Edition has the ability to create EXE files from your game. This means that your game will be compiled into a single Windows executable file. Please note that EXE files created in this fashion still depend on the same files that trans2.exe depend on to run (such as actkrt2.dll, ocx files, etc). If you create an EXE in this way, you should use the “Create Setup” utility to make an installer program for your game (see the “Create Setup” section for more info).
To create an EXE file, on the main screen, go to the File menu and select “Make EXE”. The EXE builder is similar to the PakFile Compiler, except it will create an EXE file for you.
To test the EXE file, copy it into your Toolkit2 folder and run it from Windows.
Playing Your Game
So far, we have been using the Toolkit.exe program to create our game. The Toolkit program is the editor. There is another exe file with the Toolkit called Trans2.exe. This program ‘translates’ all your files into one game. Trans2.exe is the real magic of the RPG Toolkit—it’s the game engine. So, how do you play a game?
Starting Trans2.exe
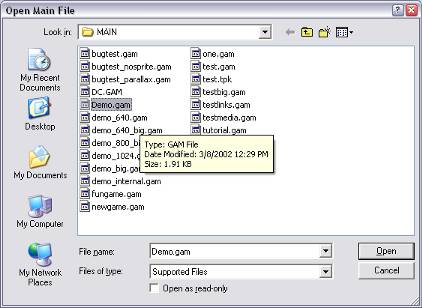 Go ahead and start
Trans2.exe. A file dialog will pop up.
Go ahead and start
Trans2.exe. A file dialog will pop up.
This dialog box lets you choose which main file you want to run. Remember—a main file gives the game it’s startup conditions, so choosing a main file is like choosing which game you want to play (since there may be more than one game in your Toolkit2 directory).
Once you choose a file, your game will start. If all went well, you should be looking at your starting board with your starting player standing on it.
When the Trans2.exe program starts up, it does these things:
- Initializes any plugins you will be using.
- Runs the startup program.
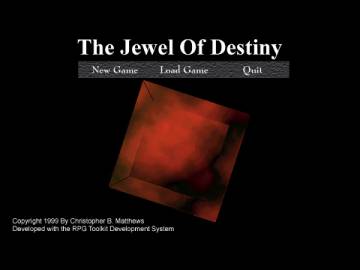 Loads
the initial character.
Loads
the initial character.- Loads the opening board and places the character on it.
The Startup Program
Your main file really, really should specify a startup program for your game. This is an RPGCode program that gets run at the very beginning of your game. It can be used to show a title screen and a story sequence, and give the player some other options. If you want, you can use the file Start.prg, which comes with the Toolkit, as a basis for your own startup program. You just have to make small modifications in order to have it show your own title screen and story sequence.
Autorun
The Trans2.exe program will automatically run a file called main.gam if it exists. If you want your game to start without being asked what main file to use, create a main file called main.gam. Also, you can run the program with a command line parameter specifying the name of the main file to run. For example, if you wanted to run a main file called myGame.gam, you would run Trans2 like this:
trans2 myGame.gam
Game Controls
Playing and moving around in the game is very simple. Here are the built-in controls:
- Arrow keys: Move around
- Shift button + arrow keys: Run
- Alt-X: Quit game
- Alt-D: Initiate debugging. The next program that is run will be debugged.
- Joystick: The d-pad of joystick 1 will cause the player to walk around
- Joystick Button 1: When held in during movement, causes player to run. It also acts as the general activation key.
Besides those built in controls, there are also some custom controls that you define when you create the main file (remember—you must set these up in the main file before you can use them):
- Internal Menu Activation Key: Pops up the internal menu system. I usually use the Enter key.
- Runtime Activation Key: This is a button on the keyboard that will automatically run some RPGCode program, as defined in the main file.
- General Activation Key: This is the key that will activate programs and items that can only be activated when the player is facing them and s/he presses the activation key.
The Internal Menu
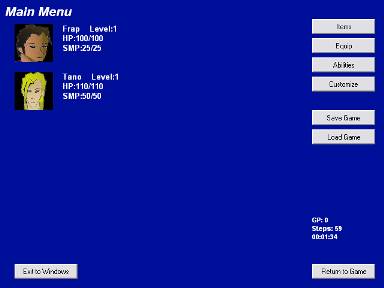 You can access the internal menu
only if you have it enabled and have chosen an internal menu activation key in
the main file. Make sure you do these
things, because the internal menu allows the player to customize the players to
a great extent.
You can access the internal menu
only if you have it enabled and have chosen an internal menu activation key in
the main file. Make sure you do these
things, because the internal menu allows the player to customize the players to
a great extent.
When the player presses the internal menu activation key (in the Toolkit’s demo game, this is ENTER), a new window will pop up. This window allows the player to customize player stats and inventories, as well as load and save games.
To begin with, the menu shows the profile images of the players on your team along the left. Next to each picture is a short display of the player’s stats. This includes the player’s name, level, HP and SMP.
In the bottom right hand corner of the window, the GP (Gold Pieces) the player has as well as the total steps taken and total game time are shown. Along the right column are a series of buttons that do different things. Here’s a description of each:
Item Submenu
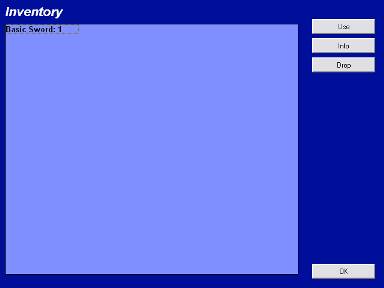 When you press the Items button,
a new window opens up. This is the
player’s inventory. It shows all of the
items the player is carrying.
When you press the Items button,
a new window opens up. This is the
player’s inventory. It shows all of the
items the player is carrying.
Items are given to the player with the #GiveItem RPGCode command. When the player receives an item, it ends up in this menu.
If an item is menu driven (it can be used from the menu), you can use it. For example, in the demo game, Cure items are menu driven. So, if I want to use one of my cures, all I have to do is click on ‘Cure’ and then hit the ‘Use’ button.
When I do this, a window will pop up showing me the players on the team. This window is asking you to choose which character the item should be used on. Click on the player you want, and hit OK. The item will be used on that player.
When an item is used a few things happen:
- If the item was to run a program when used, the program is run.
- Player stats are adjusted according to what the item should do.
- The item is removed from the player’s inventory (it gets used up).
If you want the item to remain, you could have an RPGCode program to accompany the item that would #GiveItem the item back after it was used.
You can also click on an item in the inventory and click on ‘Info’. This will give you a quick idea as to what the item does and if it can be used from the menu or not.
 Finally, you can drop any item
by clicking on it and hitting the ‘Drop’ button. This removes the item from inventory and it goes away. Key Items cannot be dropped.
Finally, you can drop any item
by clicking on it and hitting the ‘Drop’ button. This removes the item from inventory and it goes away. Key Items cannot be dropped.
Equip Submenu
If you have some items in your inventory that are equipable, you can try to equip them to a player. When you hit the ‘Equip’ button, you are asked first which player you wish to equip. Once you have chosen, the equip menu pops up.
This window shows you what the player is currently wearing for equipment. You can remove any equipment by clicking on the item to remove and hitting the ‘Remove’ button.
If you want to equip something new to the player, click on the slot where you want the item to be equipped and hit the ‘Equip’ button. This will pop up a submenu that will show you all items in inventory that can be equipped to this player in this slot. Click on an item you want and hit OK. You should see the player’s FP and DP adjust according to the new equipment.
When an item is equipped, a few things happen:
- If a program is to be run it is run.
- The equipment is equipped to the appropriate slot.
- The player’s stats are adjusted according to the equipment.
- The item is removed from inventory.
When an item is removed, these things happen:
- If a program is to be run when it is removed, the program is run.
- The equipment is removed from the player’s slot.
- The player’s stats are re-adjusted.
- The equipment is placed back in inventory.
Equipment can make the player stronger. It is up to you to decide what kinds of equipment the player can wear and what benefits it give to the player.
Abilities Submenu
 The Abilities submenu allows you
to see all of the special moves that the selected player can do. When you enter this menu, the moves are
listed, along with the amount of SMP they require to use. If a move is Menu-Driven, you can use it on
a player here.
The Abilities submenu allows you
to see all of the special moves that the selected player can do. When you enter this menu, the moves are
listed, along with the amount of SMP they require to use. If a move is Menu-Driven, you can use it on
a player here.
To use it, click on the move you wish to use, and hit the ‘Use’ button. Then you will be asked which player you want to use it on. Choose the one you want, and then the move will be used.
When a special move is used, the following things happen:
- If an RPGCode program accompanies the move, it will be run.
- The user’s SMP is reduced by the amount the move uses up.
- The target’s stats are adjusted accordingly.
Load/Save Buttons
The Load and Save buttons allow you to load and save your game. This is useful because people will rarely play a game through in one sitting. You can only save your game if it is permitted on the board.
Customize Submenu
The customize submenu allows you to customize the way the game runs. The first section allows you to adjust the menu color.
The next three sliders let you adjust the battle speed, text speed and character speed. These should be set to slow on faster machines. You can also use the #BattleSpeed, #TextSpeed and #CharacterSpeed RPGCode command to set these speeds.
Fighting
In the main file, you can tell the Toolkit whether there is fighting in the game or not. If there is, then fights may happen in your game. If the board the character is on allows fighting as well, a fight will happen after the player walks around a bit (this is determined by the main file’s fighting settings).
 When a fight starts, the player
is whisked away to a new screen. This
will show the players facing the enemies they are fighting against the
background image for the current board.
When a fight starts, the player
is whisked away to a new screen. This
will show the players facing the enemies they are fighting against the
background image for the current board.
The player will be fighting 1-4 enemies. This is determined randomly.
Which enemies are fought depends upon the fighting skill for the current board. If the board skill is 1, then only enemies of skill 1 will be fought.
Depending upon the fighting mode, the players will be standing on the right side of the screen, or at the bottom.
The Fight Menu
The fight menu is used to control your characters in a fight. Here are the things that are on it:
- To the left is a list of enemies you are fighting.
- In the middle is the command menu.
- To the right is a list of your players, including their stats and charge times.
 The
player stats to the right show you the HP and SMP of each of your players. The reddish bar shows the player’s HP. The
bluish bar shows the player’s SMP. The
yellowish bar shows the player’s charge time.
The
player stats to the right show you the HP and SMP of each of your players. The reddish bar shows the player’s HP. The
bluish bar shows the player’s SMP. The
yellowish bar shows the player’s charge time.
When a player is in a fight, they must ‘charge up’ before doing anything. The charge time bar will fill up for each player during the fight. When it reaches the maximum, the player will be able to fight. If a player is able to fight, his name will flash, and the command menu will be available.
Enemies also have a charge time, although you may not see it. Fights in the RPG Toolkit are active. This means that the enemies will fight when they are ready instead of waiting for the player to take his turn. This means that you have to be quick when you are fighting, because the enemies are quick, too.
Command Menu
When a player can fight, the command menu becomes available. This allows you to choose several things the player can do:
- Fight (Physical Attack)
- Item (Use an item)
- Special Move (May have a different name, or be excluded altogether).
- Run (Run away. May be excluded).
Depending on the character, you may want to do different things. Here’s what each command does:
· Fight: Basic physical attack. This allows the player to choose an enemy (or player) to attack. The total HP removed from the target is the player’s FP minus the enemy’s DP. If the player has an item equipped on the left or right hand, and that item is Battle Driven, and it has an associated RPGCode program, that program will also be run.
· Item: This will show a list of all the items the player can use from battle (Battle-driven items). The player can select an item to use and then use it on an enemy or character.
· Special Move: If the player can do special moves, this will show a list of all special moves the player can do (battle-driven moves). You can choose one to do, and also who to use it on. It will be used only if the player has enough SMP to use it.
· Run: If you can run from the enemy, this will let the player try to run. There is a 2 in 3 chance of it being successful. Once the player runs, the fight is over.
Ending the Fight
The fight will end when one of these three things happen:
- All enemies are killed (player is returned to the board and continues the game).
- The player runs (player is returned to the board)
- All characters are killed (HP=0). Game Over.
When the player wins a fight, experience and GP are given to each of the players who are still alive. The player will level-up when experience reaches a certain level.
Make it Work
The only way to get your game working perfectly is by playing it. You will find bugs and things that you will have to fix later on. When an RPGCode program is run, you will be notified of any problems with your code, because a debug window will pop up explaining what’s wrong.
No game is perfect on its first run. Even professionals hire people to play their games to find all the mistakes they’ve made. The RPG Toolkit eliminates many of these bugs by having much of the players’ actions already coded and debugged. However, there will come points where your player can’t walk in places he/she should be able to. Your RPGCode programs will often not do exactly what you want them to do on their first run. And worst of all- the game may lock up.
All of the above problems do have remedies, and it’s easy enough to find out why something is going wrong. It’s fixing it that causes problems. I have listed here a few problems you may encounter and some possible solutions.
Problem 1- I can’t move to the
next board.
Solution- Sometimes you may be playing a game and your character will move to the edge of the board and will not be able to move onto the next board. When this happens, there may be a number of reasons:-
-There is no link to the next board. To check this, go into the board editor and load the board in question. Check the board information and check the links. There may be one missing, or the filename that the link points to may not exist.
- It may be that the tile to which the player will move to on the next board is solid. If this is the case, then the player will not move onto the solid tile on the next board. To check this, load the next board in the board editor and check the tile to which the player should go to by right clicking on it. If the tile is solid, change it to Normal or Under.
Problem 2- I can’t see my
character!
Solution- This happens when your player does not have graphics, or you have not set the initial board position. To fix this, give the character graphics, or go to the Board Editor, and set the player position.
Problem 3- My runtime program won’t run
Solution- You may be pressing the wrong key. Check the Main File in the Main File Editor to see which key is correct. Also, the filename of the program may not exist, or the program may not do anything in the first place. In this situation, check the program itself to see what it actually does. Sometimes including a little #MWin statement at the very first of the runtime program will allow you to at least see if the runtime program is being run each time you try it.
Problem 4- One of my programs just isn’t working right
Solution- This is by far the worst problem you will encounter. Programs are rarely perfect the first time they are run. Usually, if there is a problem with the way you use a command, the Translator will tell you what the problem is when you run the program. This is one of the hardest problems to fix because there is no cut and dry method of determining if the program is doing something wrong.
The best solution is to load the program in the Program Editor and start at the top line, and trace through its steps in your mind. Maybe a variable isn’t being given the correct value. The only way to fix this problem is to look through the programming code yourself.
Problem 5- The game locks up
Solution- In almost every case, lock ups are due to mistakes in RPGCode. You will probably find that lock ups only occur when you run a program. This is easily fixed. Just look at the program causing the lock ups in the Programming Editor, and look for any loops that may continue on into infinity. Here’s an example:
* An infinite loop that will lock up
* your computer. DO NOT run this!!!!
#done!=0
#While(done!==0)
{
}
In the above example, the program will continue to loop forever, and so the computer will lock up. The only way to get your computer back after it locks up is by hitting CTRL-ALT-DEL.
If you find anything that loops forever, put in some way for it to break out of the loop.
Also, if you are using a multitask program, make sure you use #Branch loops instead of #While loops.
Locking up will almost always be caused by something like this. There are times, though, that for some reason a program will just lock up for no discernible reason. This is true of the RPG Translator. If the program seems to lock up for no reason, it is probably caused by the program itself. It may even be caused by your computer, due to faulty internal configurations or other reasons. If this persists, fill out a bug report at http://rpgtoolkit.com
Problem 6- I can’t enter
fighting sequences, or I get a Game Over the moment I enter them.
Solution- This will happen if:
1) There is no fighting allowed on the board OR in the game (check the Main File and the board file itself).
2) The chances of getting in a fight have been set astronomically low (i.e., if the chances of getting in a fight are 1 in 200,000). Check the Main File.
3) There are no enemies with the same skill level as is set by the board- create enemies with the proper skill level.
4) Your player’s health is 0, causing a Game Over. Set the health in the Character Editor.
Expect to find lots of bugs in your games, especially in the larger ones. The only way to fix them is to check all the settings you have made for the board you are on, the programs on the board, etc. It may take a little time, but it’s worth it!
Setting Up a Game For Distribution
Once you have a game made, you’ll probably want to make it available to other people to play.
 The Toolkit comes with a Setup
Kit program that will create a setup file for you. You can run this program by hitting the ‘Create Setup’ button in
the Toolkit, or by running setupkit.exe.
The Toolkit comes with a Setup
Kit program that will create a setup file for you. You can run this program by hitting the ‘Create Setup’ button in
the Toolkit, or by running setupkit.exe.
The program has a few things to fill out. First is the main file of your game. This is the main project file for your entire game. Next, you can add an image to be used in the setup program (like a screenshot).
The default directory for your game is the location where you would like your game to be installed on another computer.
The location of your Toolkit directory is probably c:\Program Files\Toolkit2. If it is not, specify the directory location.
Once you have this information filled out, hit the ‘Create Setup’ button and follow the directions onscreen. When all is said and done, you will have a .zip file sitting on your computer that contains your game and a setup program for your game. I suggest you test out the setup program before distributing the game.
When you distribute your game, you must keep in mind the rules set out in the EULA.txt file so that you don’t infringe on my copyright. Please read the License Document for more info on distribution.
The setup utility also works for .TPK files and .EXE files you have created with the Toolkit. You would select these files in place of a main file if you wish to distribute your game as a PakFile or an EXE.
Installing Upgrades
The Toolkit is undergoing constant upgrades. Almost certainly, by the time you install the Toolkit from your CD, there will be an upgrade available. Upgrades occur with such frequency for a number of reasons:
 Bugs
have been found and fixed.
Bugs
have been found and fixed.- New features have been added to the Toolkit.
- Portions of the Toolkit have been made faster.
Don’t worry– upgrades for version 2 are free for registered users. To obtain an upgrade, go to the RPG Toolkit website (http://rpgtoolkit.com).
In the downloads section of the website, you will find a section for Upgrades. Just download the latest upgrade file. When you download the upgrade file, it will be a compressed update archive (.udc) to save disk space. Copy this file to your Toolkit2 folder.
On the main screen of the Toolkit, there will be a button at the bottom left hand side, called Install Upgrade. Click on it. This will force you to exit the Toolkit while the upgrade is being installed.
A new window will pop up. This is the upgrade wizard.
To begin with, just click in the space that reads ‘Click Here’. This will allow you to select the upd or udc file you downloaded earlier.
Some upgrades will require you to install system files. If you want, they can be installed directly into your windows/system folder, or you can have them relocated if you don’t want to overwrite your system files.
Once you are ready, hit ‘Install Upgrade!’. The upgrade will be installed, and in a few moments you will find yourself back in the Toolkit. The Toolkit has just been upgraded!